

OVERVIEW
The FYB Connect 365|2CM Module automatically transfers information from SharePoint into OpenText’s Content Manager.
AUTHENTICATION AND ACCESS
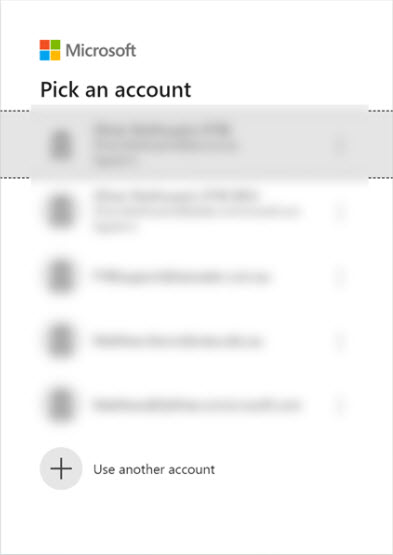
The 365|2CM module uses Azure AD authentication to validate the user’s credentials. Users will be required to enter their Microsoft 365 login details to sign into the application.
Only Content Manager Administrators, Record Managers and users added to the Basic and Admin whitelist fields in 365|2CM's admin tab can access 365|2CM.
LAUNCHING THE APP
- Open a web browser and navigate to the FYB Connect 365|2CM address
- Sign in using your Microsoft Account. This account must belong to the Microsoft Tenant used during the installation of FYB Connect
- After a successful sign in, the 365|2CM module will load
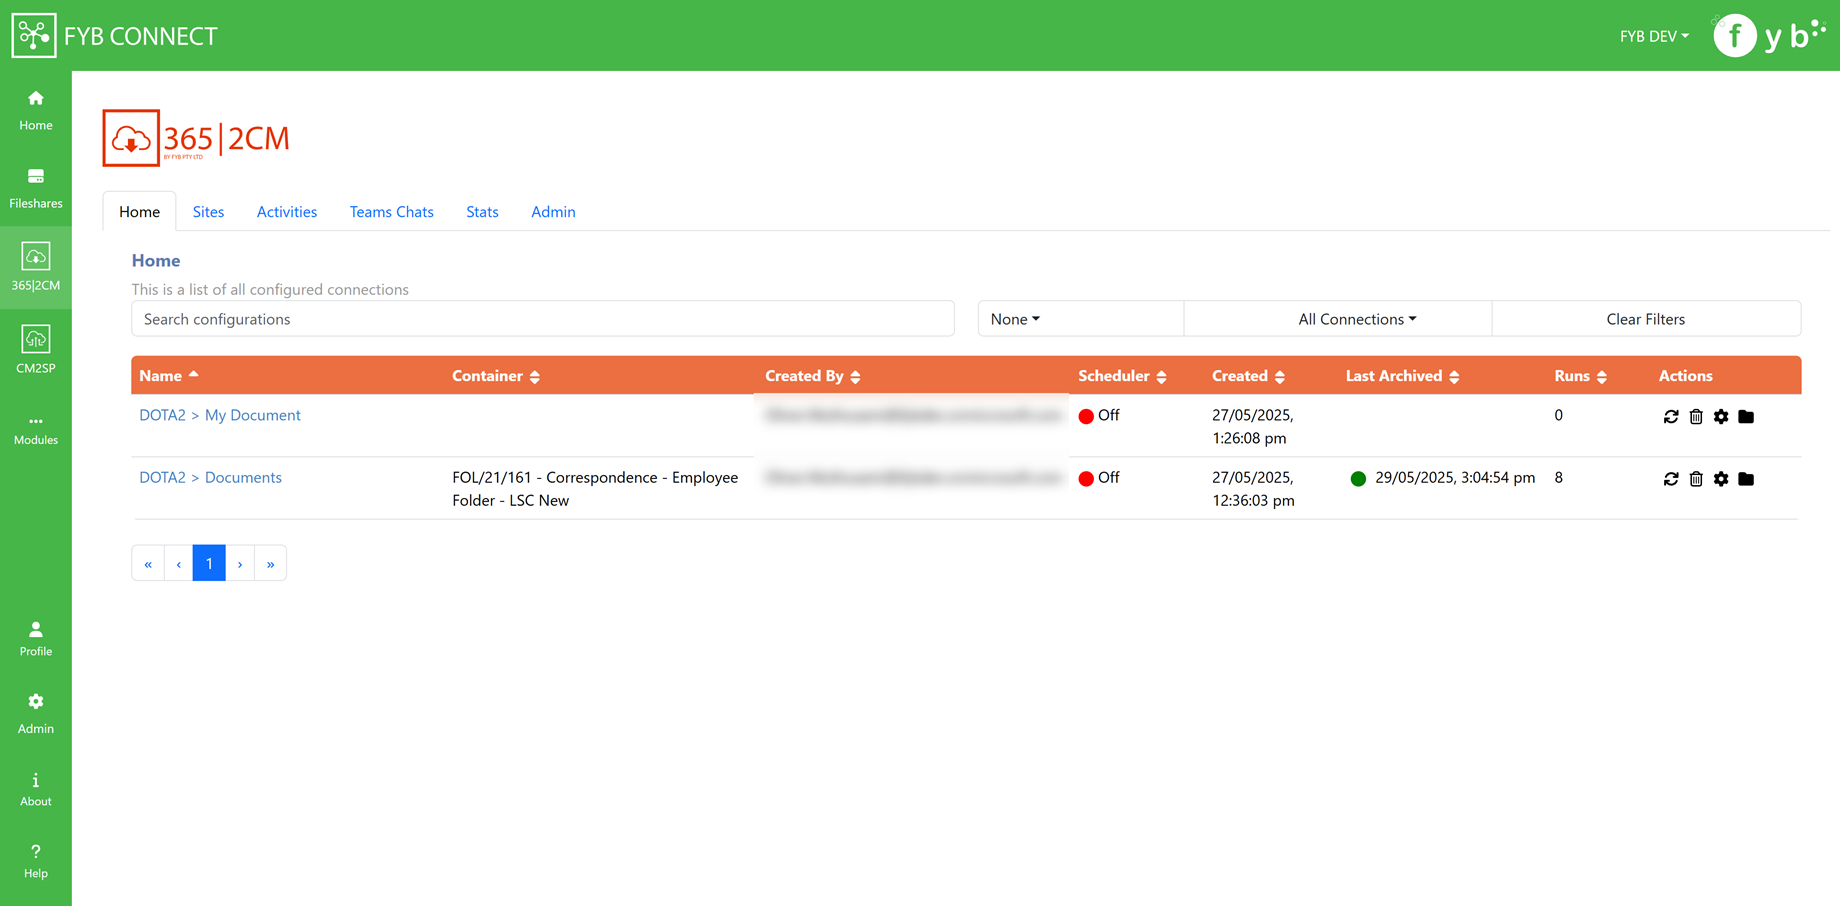
HOME
The home screen displays a list of connected Document Libraries. Initially, this screen will be blank as there are no connected SharePoint libraries.
INSTANT ARCHIVE
Only Content Manager Record Coordinators and above manually archive documents.
If there is ever a need to instantly process all documents outside of the scheduled period, the instant process button can be used.

Please note that syncing large files can lead to high CPU and memory usage.
DELETE CONNECTION
You can remove a connection by pressing the bin icon. Once deleted, the document library will no longer be processed by the background scheduler.

CONFIGURE
The configure action allows you to quickly adjust the current settings.

CONTENT MANAGER FOLDER
The CM folder action allows you to view the connected CM folder.

SCHEDULER
The Scheduler column determines whether the document library should be automatically processed by the background service. The status can be updated via the settings screen.

NAVIGATING TO THE DOCUMENT LIBRARY
You can navigate to the desired document library on SharePoint by clicking on the name of the library, this will launch an external browser window that takes you to the document library itself.

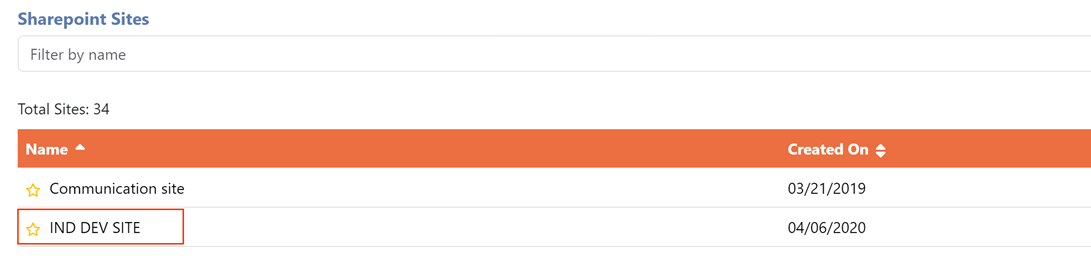
SITES
The sites screen displays all SharePoint/Teams sites for the organization that the logged-in user has access to.
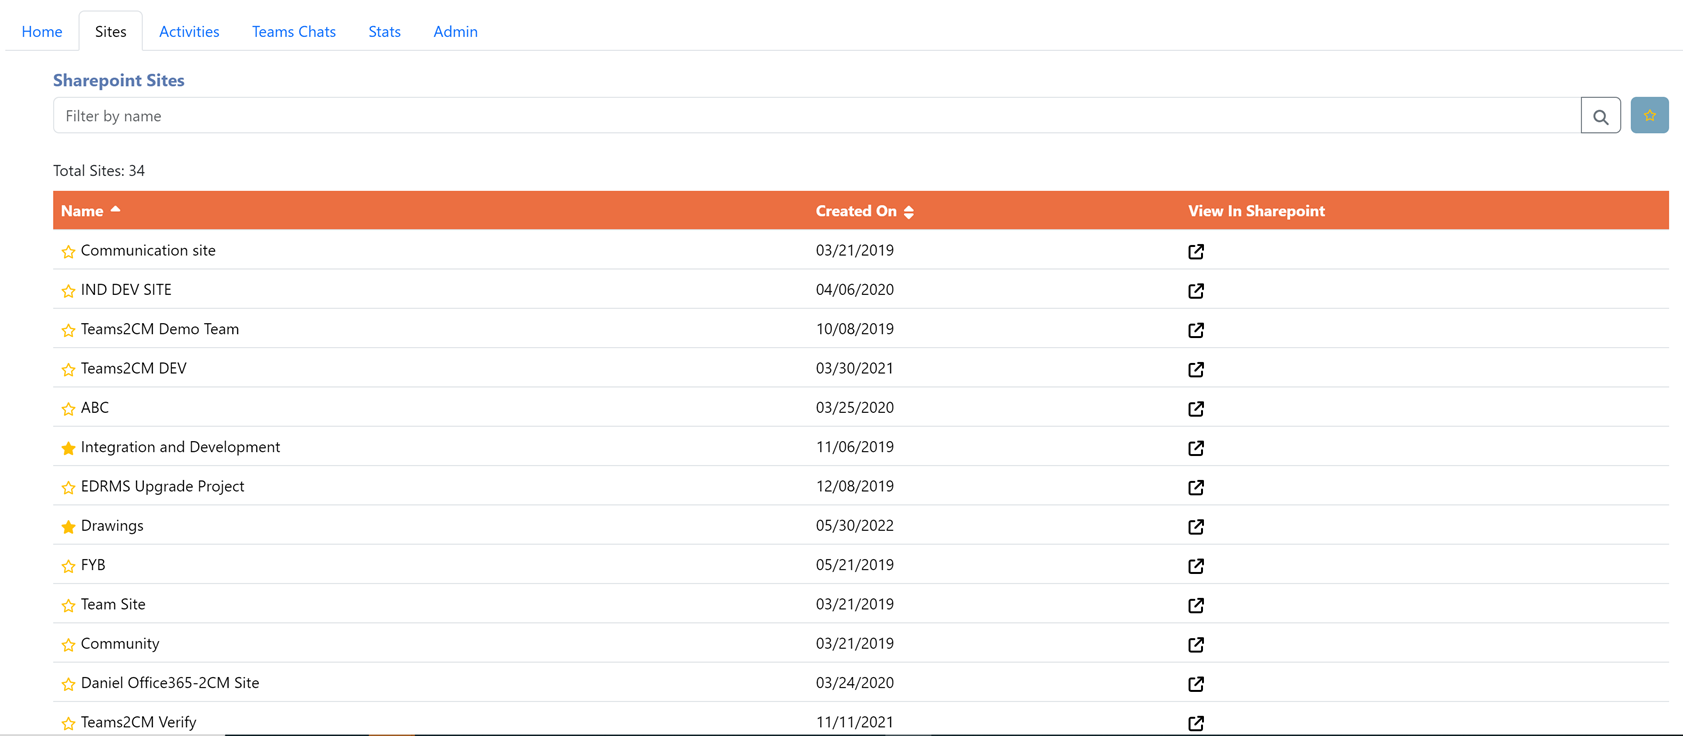
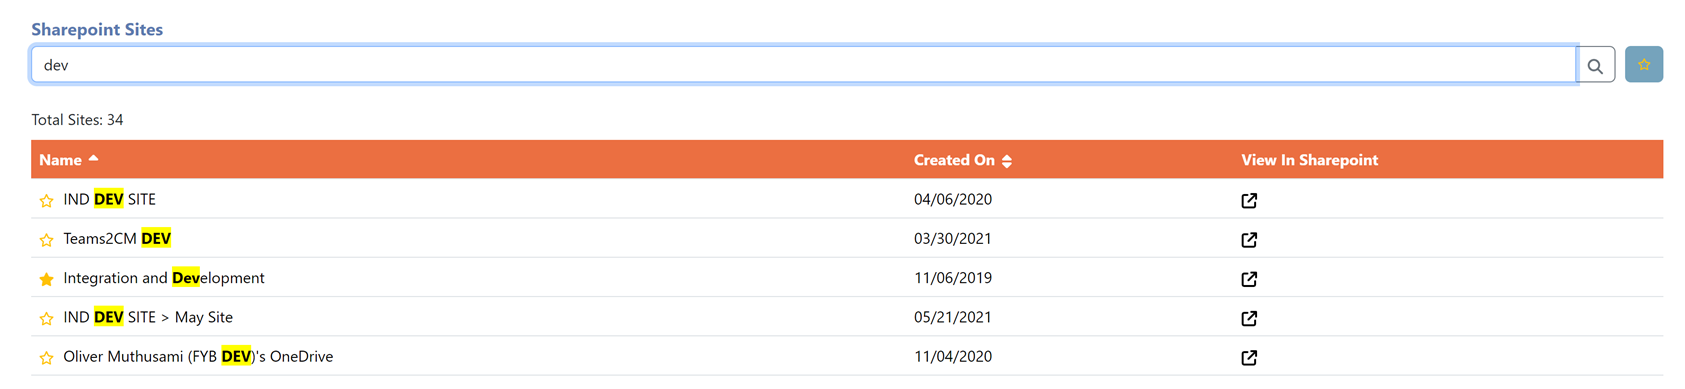
SEARCH BAR
The search bar allows you to search for specific sites.
In addition to searching, you can view all your favourite sites by clicking on the favourite icon.
FAVOURITE SITE
Any site can be added to your favourite list by clicking on the star icon and to unfavourite simply click the icon again.
CONNECTING A DOCUMENT LIBRARY
- Click on a Site on the Sites tab
- All document libraries associated with the site will be displayed
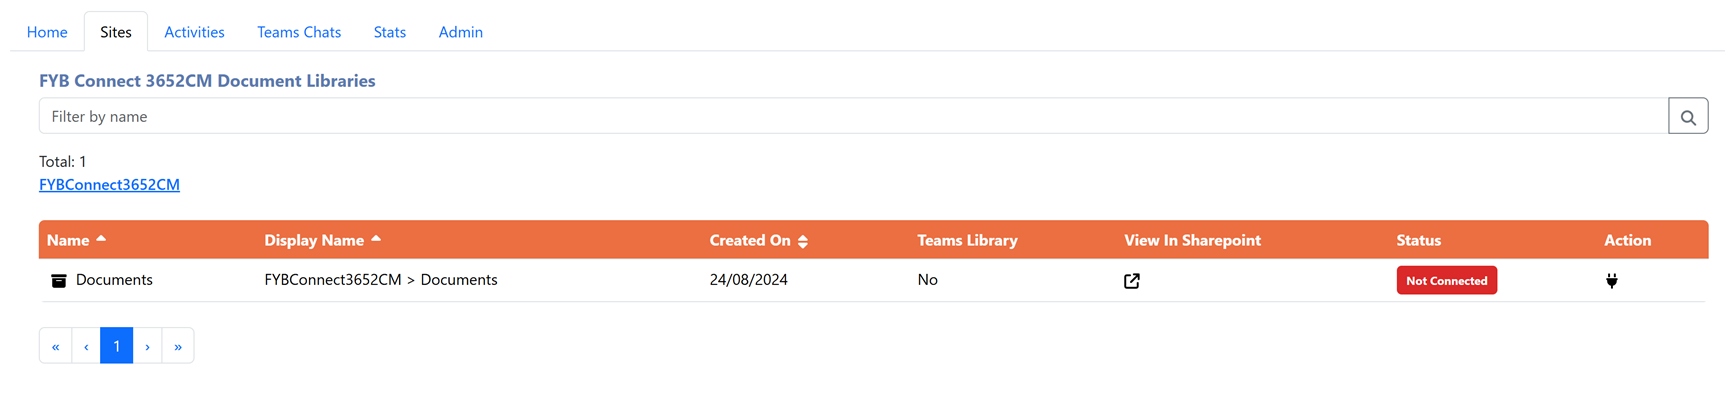
Document Libraries connected to Microsoft Teams will have a Team Library value of Yes
2a. A connection can be made by clicking on the plug icon of the document library
2b. Alternatively, a connection can be made to a subfolder by clicking on the name of the Folder/Document library

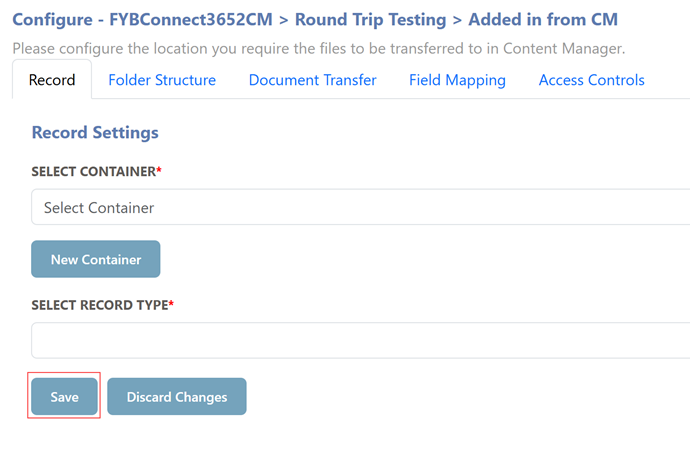
3. Configure the connection to the desired settings. Refer to the configuration sections below for a detailed description of each configuration item
4. Click Save
5. Navigating the the Home tab on the 365|2CM page will show the newly configured connection
RECORD CONFIGURATION
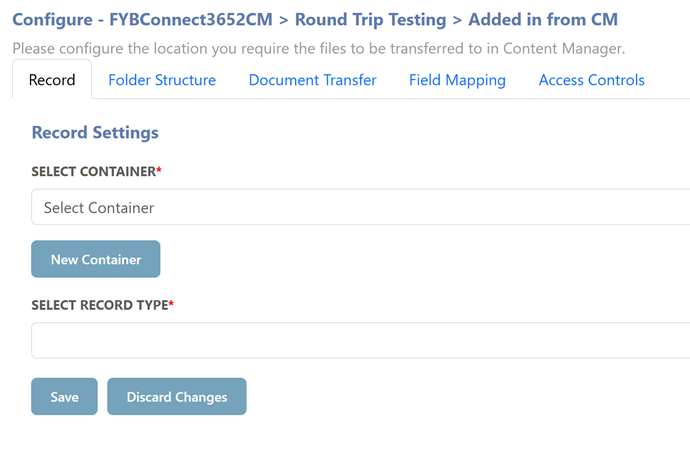
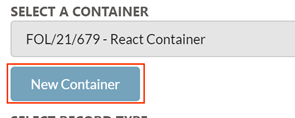
- CONTAINER: Provide the CM container you wish to connect to, this can be searched for by its record number, title or URI
- NEW CONTAINER: Use this button to create a new container to configure the connection to
- RECORD TYPE: Select the desired document record type from the drop-down menu. FYB Connect will use this record type when creating Document Records.
FYB Connect does not support record types that have a mandatory additional field with the search clause value "DocumentType". This is because of a conflict with the Content Manager SDK.
FOLDER STRUCTURE CONFIGURATION
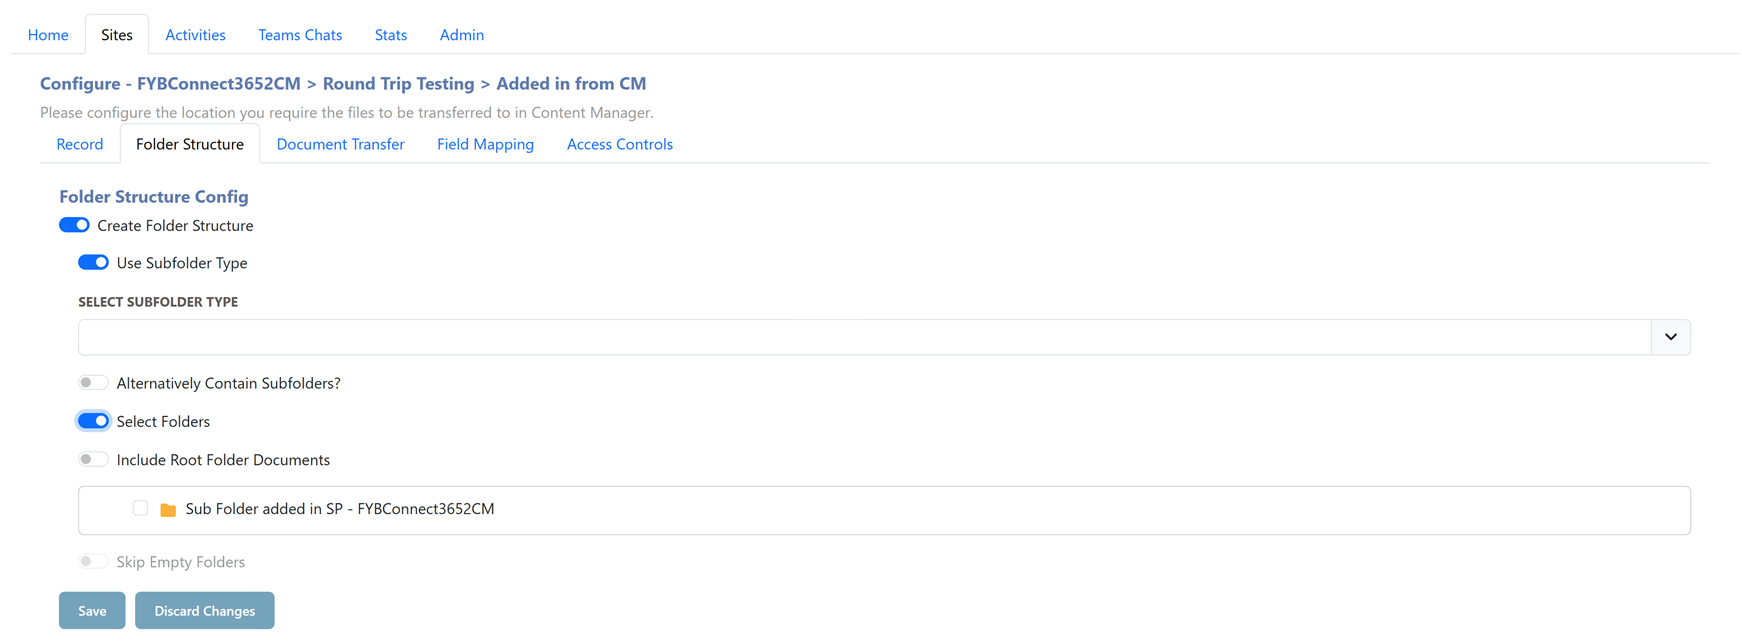
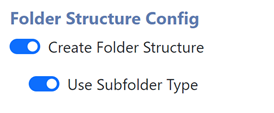
- Create Folder Structure: If enabled, FYB Connect will replicate the folder structure found in the SharePoint. If this option is not enabled, folders will not be created and all documents will be uploaded to the root container
Unless specified, the Record Type used for the root container will also be used for all sub containers
- Use Subfolder Type: Enable this option to use a different record type (from the record type set on the root container) to create Sub Containers. See the SPECIFYING A RECORD TYPE FOR SUBFOLDERS section for more information.
- Alternatively Contain Subfolders: This option is only available if the Use Subfolder Type option is enabled. If enabled, Subcontainers are alternatively contained within each other instead of using the normal containment.
- Select Folders: Enabling this option will allow you to specify which folders you would like to archive during the archive process by selecting the adjacent checkboxes. Clicking on a folder will display its child folders (if any).
- Include Root Folder Documents: Enabling this option will allow for documents within the root folder to be archived when the Select Folders option is enabled.
- Skip Empty Folders: If enabled, Folders that contain no documents will not be transferred to Content Manager.
SPECIFYING A RECORD TYPE FOR SUBFOLDERS
To specify a different Container Record Type for creating subfolders, follow the steps below:
-
Enable the Create Folder Structure option
-
Enable the Choose Subfolder Record Type option
-
Select a Record Type

-
Selecting a Record Type will display the mandatory fields required for that Record Type

-
Enabling the Alternatively Contain Subfolders will create alternatively contained relationships between the subfolders. If this is disabled, then sub-containers will be contained within each other
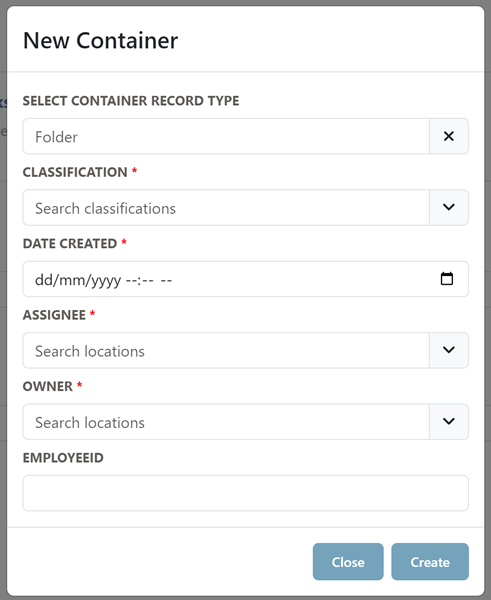
SUGGESTED CLASSIFICATIONS
If the ENABLE CLASSIFICATION SUGGESTIONS admin option is enabled, 365|2CM will suggest a list of classifications to use based on the names of Files and Folders in the SharePoint Document Library.
-
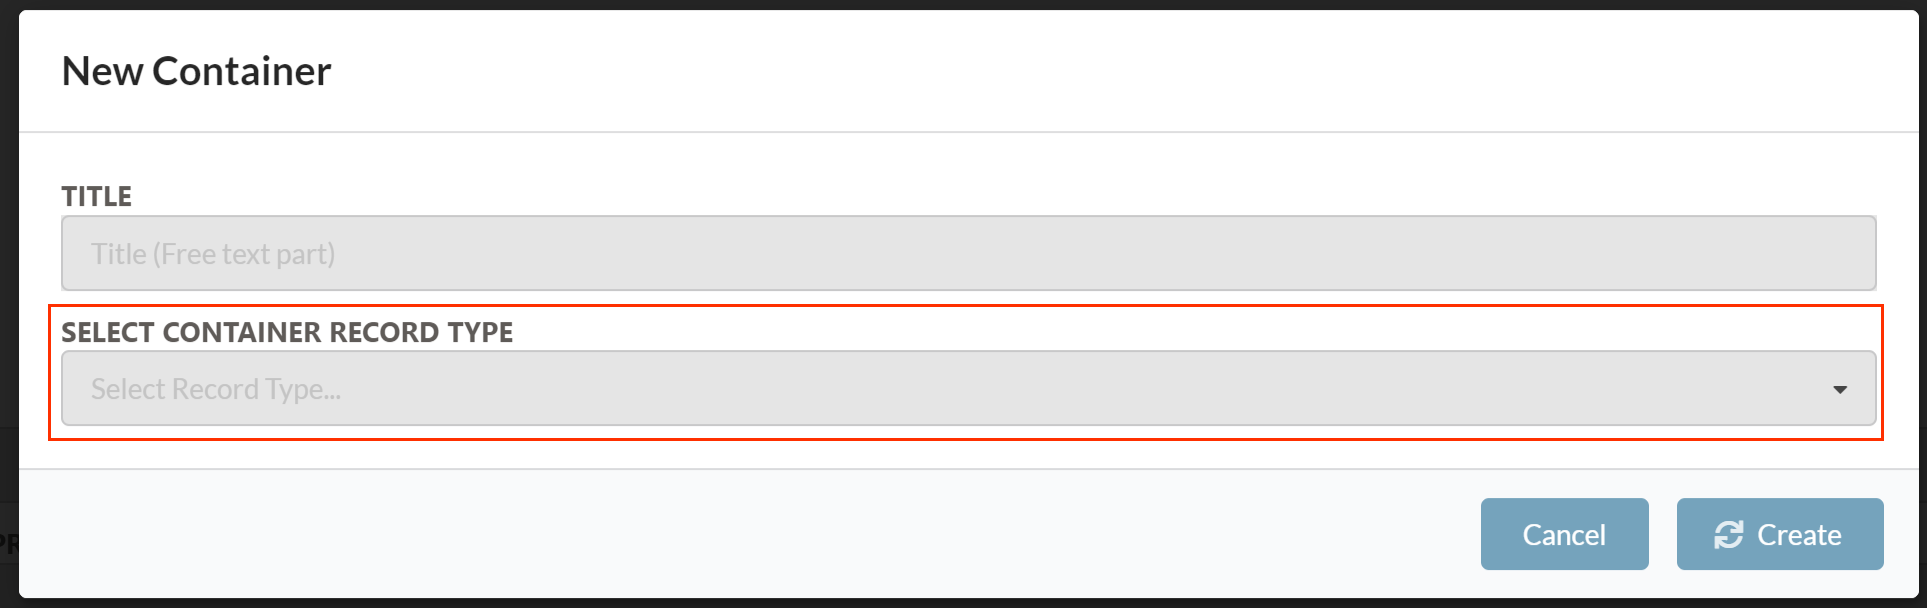
In the Configuration Page of a SharePoint Connection, click on the New Container button
-
Select a Record Type
-
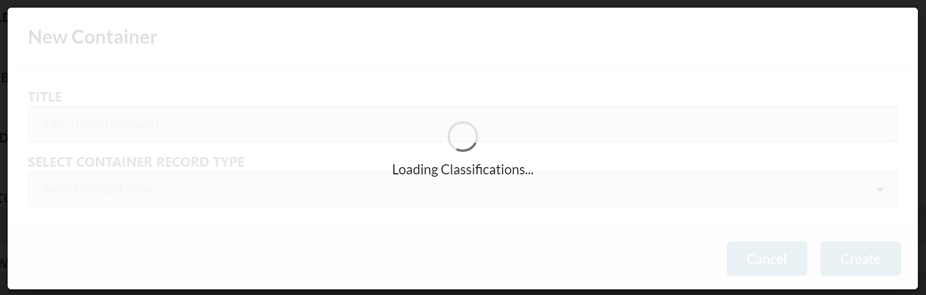
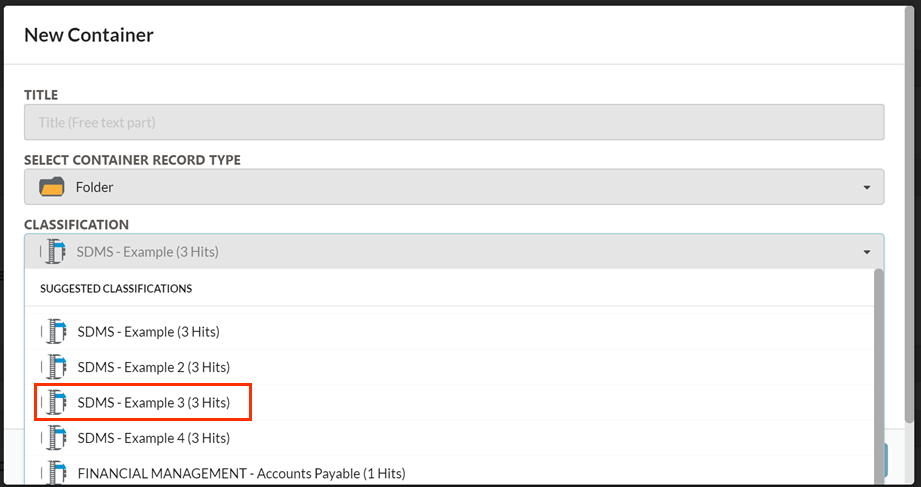
If the selected Record Type has a classification field, 365|2CM will generate a list of Classifications based on the File and Folder names within the Document Library
-
Select a suggested classification.
DOCUMENT TRANSFER SETTINGS
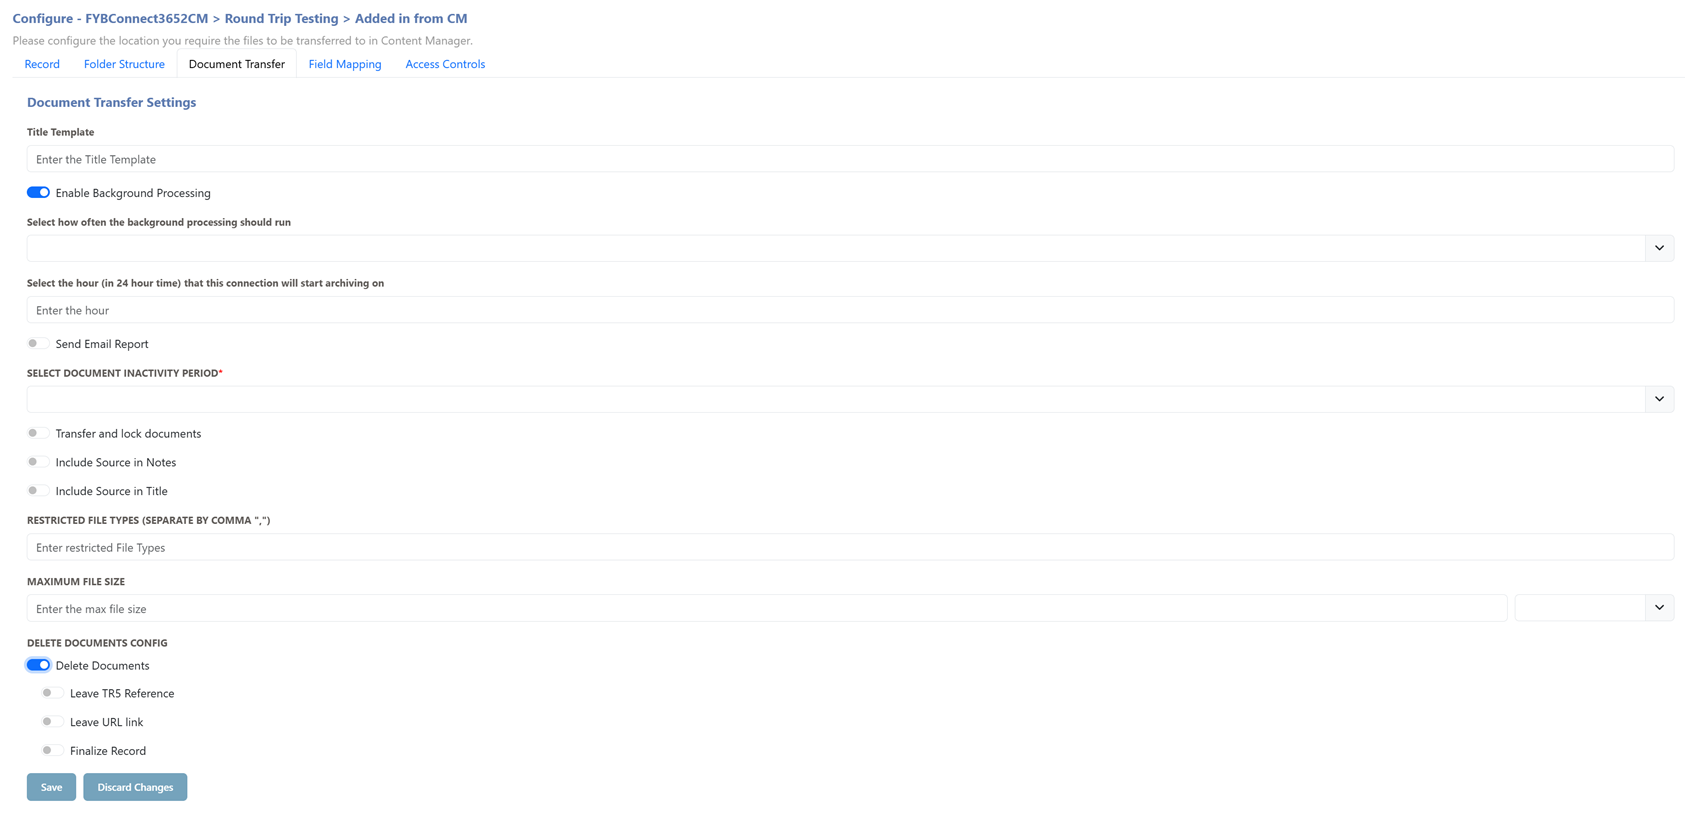
- TITLE TEMPLATE (optional): Supply a template to be used for the Record's title.
The following placeholders can be used in the Title Template field. This will be replaced with the actual data coming from SharePoint when creating the Record.
| Placeholder | Data |
|---|---|
| {DOCUMENT_NAME} | The name of the document |
| {DOCUMENT_ID} | The ID of the document |
| {FOLDER_NAME} | The name of the Folder that the document is within |
| {SITE_NAME} | The name of the SharePoint Site |
| {LIBRARY_NAME} | The name of the SharePoint Document Library |
| {DATE_CREATED} | The created date of the document |
An example title template value: {FOLDER NAME} \ {DOCUMENT NAME}
- Enable Background Processing: If enabled, this option allows the background service to automatically archive the library periodically without user intervention.
- Run Frequency: This field is available when Enable Background Processing is enabled. It specifies how often the connection will be archived in the background
- Select Scheduler Hour:
This field is only when Daily, Weekly Or Monthly is selected for the run frequency. It specifies which hour the scheduler will run on (in 24 hour time). For example, if 21 is set, then the connection will be archived at 9:00pm instead of the default 7:00am.
| NAME | DESCRIPTION |
|---|---|
| Hourly | The connection will archive documents every hour. |
| Daily | The connection will archive documents daily at 7:00 AM. |
| Weekly | The connection will archive documents once a week on Monday at 7:00 AM. |
| Monthly | The connection will archive documents on the first day of every month at 7:00 AM. |
- Send Email Report: Enable this option to send an email report to the user who ran the connection. This report will contain the number of documents and folders transferred as well as the number of errors that occurred (if any).
- Select Document Inactivity Period: This is how long a document must be inactive before the connector will move it to CM
If none is selected, the inactivity period is ignored
- Transfer and Lock documents: If enabled, the Update Document Access control will be locked to the Service Account for all documents transferred via FYB Connect. This will allow users to only make changes to the Document in its source. If this option is enabled, then the Delete Document option is disabled.
Enabling this feature will prevent manual archiving for users that do not have the Bypass all access controls permission
- Include Source In Notes: Enable this option to include the source of the document in the Record's notes.
- Include Source In Title: Enable this option to include the source of the document in the Record's title.
- Restrict File Types: section allows you to enter any file types that you do not want to migrate to Content Manager. For example, if you do not want MP4 and text files to be migrated, enter a comma-separated list of these extensions: .mp4,.txt
- Max File Size: Specify the max file size (either in Gigabytes or Megabytes). Files that exceed the specified limit will be skipped during the archive.
- Delete Document: Enable this option to remove documents from the source after the transfer has been completed. If this option is enabled, then the Transfer and Lock is disabled.
- Leave TR5: This option will only appear if the delete option is enabled. The Leave TR5 option allows you to leave a Content Manager reference file after deleting the document from the SharePoint
- Finalize Record This option will only appear if the delete option is enabled. The Finalize Record option allows you to finalize the record after deleting the document from the SharePoint
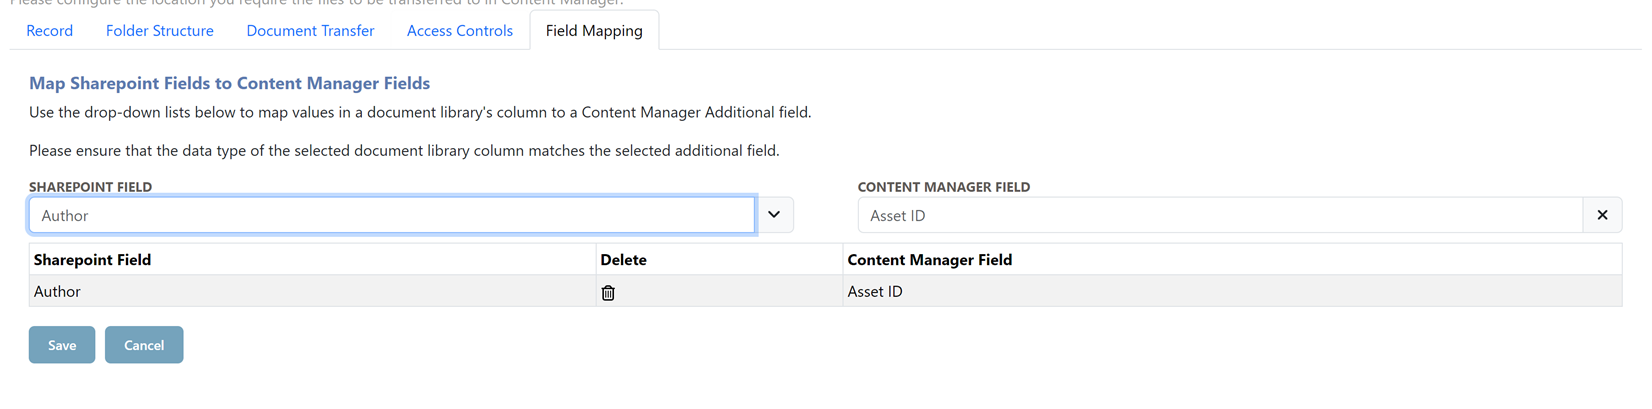
FIELD MAPPING
The Field Mapping tab allows you to map SharePoint/OneDrive fields to Content Manager fields and push the data across
ACCESS CONTROLS
To use this feature, the ENABLE ACCESS CONTROLS must be enabled in the Admin Console
This feature is only available to 365|2CM Administrators.
The Access Controls screen allows 365|2CM Administrators to lock certain access controls to locations that are members of the SharePoint Site. Locations are matched by the email addresses of the users found within the SharePoint Site.
- Enable the desired Access Controls to apply to the Containers and Document records that will be generated during the archiving process. Access Controls that are not enabled will use the default access controls for the record type.
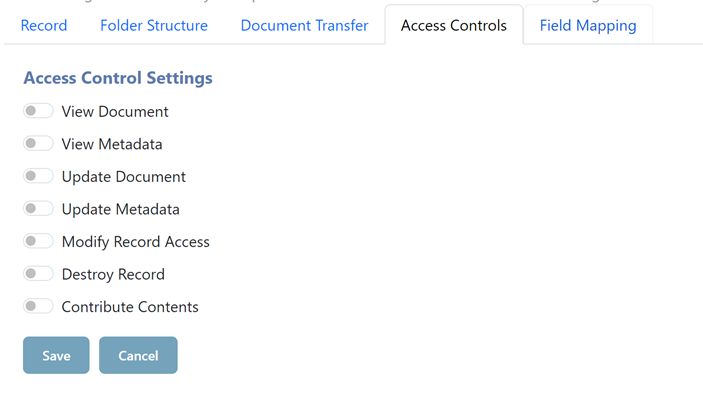
- Click on the Save button
CAPTURING TEAMS CHANNEL POSTS
Sites that originate from Microsoft Teams have an additional option to capture Teams channel posts.
-
Navigate to the SITES tab and search for a site that is associated with a Microsoft Team, click on this site
-
Select the documents drive that is associated with a Microsoft Team.

-
Enable the ARCHIVE TEAMS CHANNEL POSTS option On the Teams Post Settings tab. This option is only available for drives associated with a Microsoft Team
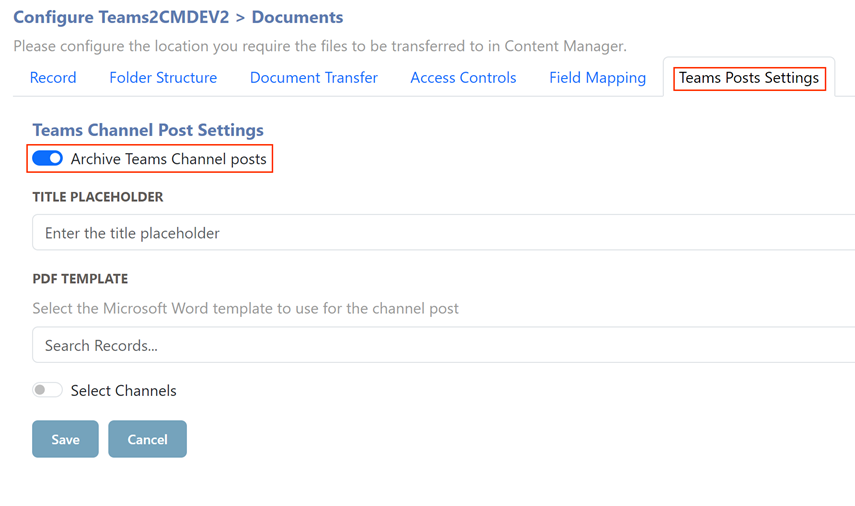
TEAMS POST CONFIGURATION
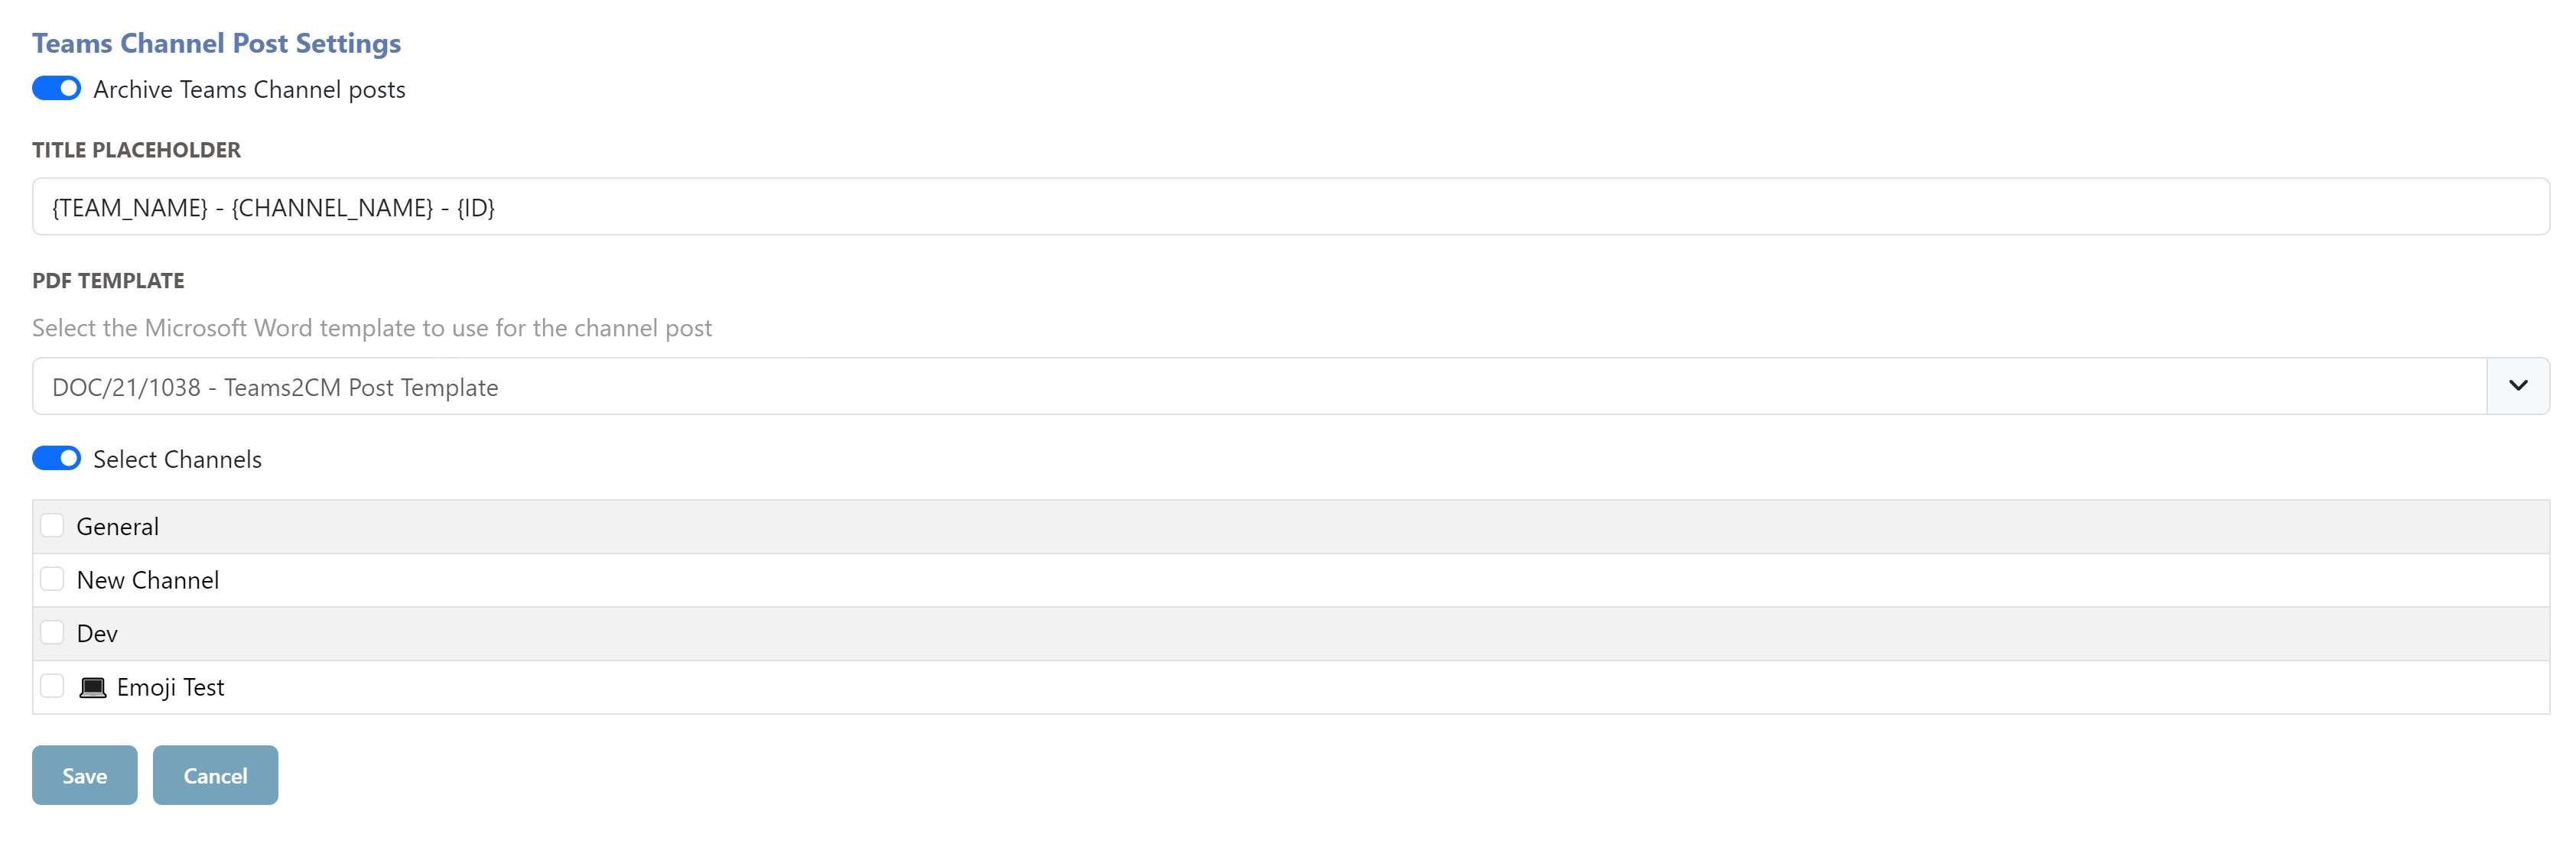
To capture Teams Posts from the channel as PDF Records, the following settings will need to be configured.
| NAME | DESCRIPTION |
|---|---|
| TITLE PLACE HOLDER | Specify placeholders for the title that will be used when creating Records from Teams Posts, see the TITLE PLACEHOLDERS section for more information. |
| PDF TEMPLATE | Specify the record number of the Word template to be used when capturing Teams posts. See the PDF WORD TEMPLATE section for more information. |
| SELECT CHANNELS | If enabled, you can select which channels to archive posts from. If disabled, all posts from all channels are archived. |
TITLE PLACEHOLDERS
The following placeholders can be used in the Title Placeholder field. This will be replaced with the actual data coming from the Teams Post when creating the Record.
| Placeholder | Data |
|---|---|
| {TEAM_NAME} | Name of the Team |
| {CHANNEL_NAME} | Name of the Teams Channel |
| {SUBJECT} | The Teams Post subject |
| {ID} | The Teams Post Id |
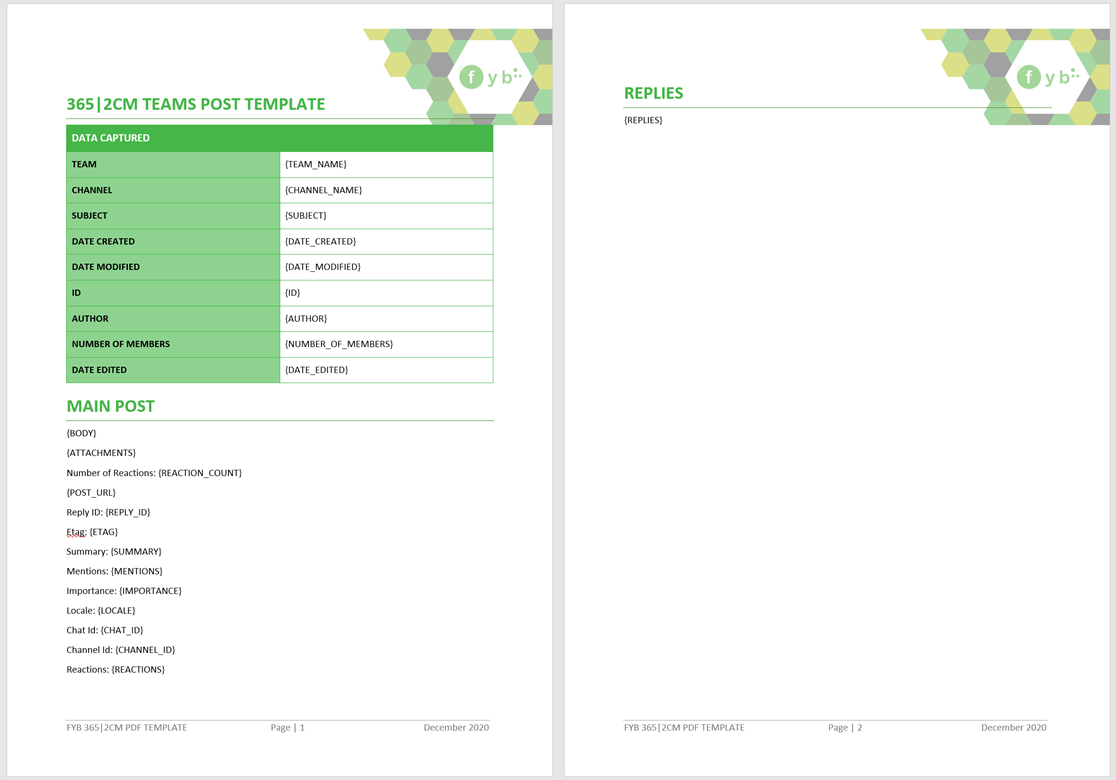
TEAMS POST TEMPLATE
A Microsoft Word template is required for generating PDFs for Teams Posts. The following placeholders can be used to capture data coming from the Teams Posts. The template must be stored in Content Manager.
| Placeholder | Data |
|---|---|
| {TEAM_NAME} | Name of the Team |
| {CHANNEL_NAME} | Name of the Teams Channel |
| {SUBJECT} | The Teams Post subject |
| {BODY} | The body content of the Teams Post |
| {DATE_CREATED} | The date created of the Teams post |
| {DATE_MODIFIED} | The date last modified of the Teams Post |
| {AUTHOR} | The display name of the author of the Teams Post |
| {REACTIONS_COUNT} | The number of reactions that the Teams Post received |
| {ID} | The ID of the Teams Post |
| {REPLIES} | All replies to the Teams Post |
| {ATTACHMENTS} | All image/gif attachments of the Teams Posts |
| {POST_URL} | Url to the post in Teams. This will be rendered as a hyperlink labelled "View Post" |
| {NUMBER_OF_MEMBERS} | The number of members in the Team |
| {DATE_EDITED} | The date the post was last edited |
| {DATE_DELETED} | The date the post was deleted on |
| {REPLY_ID} | The ID of the parent message/post |
| {ETAG} | Version number of the chat message |
| {SUMMARY} | Summary text of the chat message |
| {MENTIONS} | A comma-separated list of mentions in the post |
| {IMPORTANCE} | The importance of the post. The possible values are: normal, high, urgent |
| {LOCALE} | Locale of the post set by the client. Always set to en-us. |
| {CHANNEL_ID} | The Id of the Channel |
| {TEAM_ID} | The Id of the Team |
| {REACTIONS} | Comma-separated list of reactions on the post |
An example Word Template:
CAPTURING TEAMS CHAT MESSAGES
This feature is open to all users and allows each user to archive their personal Teams Chat Messages as PDFs and chat files to Content Manager. The Teams Chats page can be navigated by clicking on the Teams Chats tab.
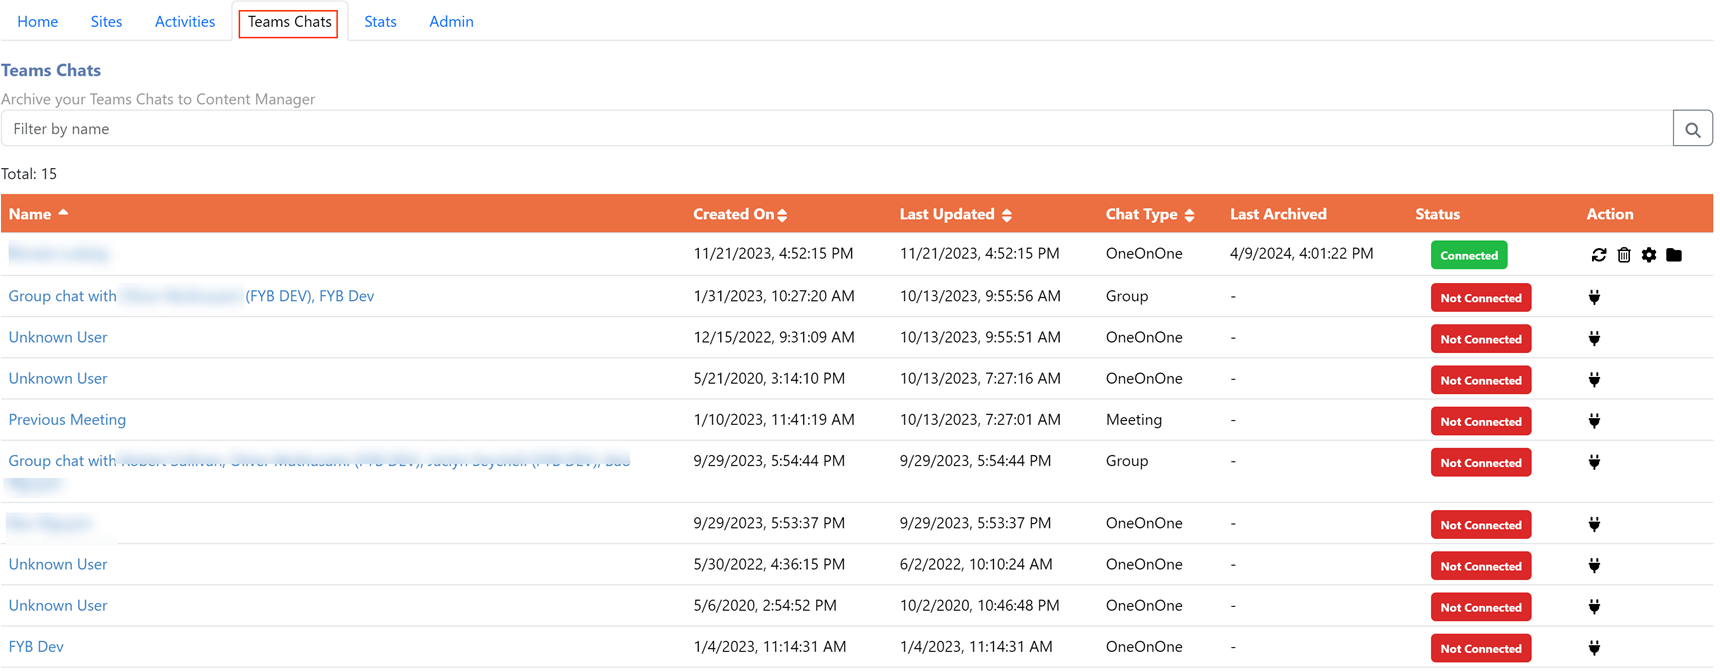
| NAME | DESCRIPTION |
|---|---|
| Chat Display Name |  The Name of the Teams chat, clicking on the Display name will open the Chat in Teams |
| Last Updated | The date that the Teams Chat was last updated |
| Last Archived | The date that the Teams Chat was last Archived to Content Manager |
| Chat Type | The type of the Teams chat |
| Status | The background scheduler status (either On, Off or Not Configured) |
 |
Configure a connection to a Teams Chat to enable archiving |
|
Instant archiving - Instantly archive a Teams chat within a given date range as a PDF to Content Manager. Subsequent archives will create a new Record Revision. |
|
Delete Configuration - Deletes the configuration to a Teams Chat |
|
Configure - Adjust the current configuration settings for the Teams Chat |
|
The CM folder action allows you to view the connected CM folder |
TEAMS CHAT CONFIGURATION
To configure a new connection to a Teams Chat:
-
Click on the plug Icon

-
You will be redirected to the configuration screen

-
Provide the record number for the CM container you wish to store that chat within, this can be searched for by number, title or URI.
Alternatively, you can create a new folder by pressing the New Container button, which will redirect you to the Create a New Container screen.

-
Select the desired document record type from the drop-down menu
-
Select a template Record for creating PDFs. This record must be a Word document. See the Teams Chat Template for more information
-
Specify placeholders for the title that will be used when creating Records from Teams Chats. The following placeholders can be used in the Title:
| PLACEHOLDER | DESCRIPTION |
|---|---|
| {CHAT_ID} | The ID of the Teams Chat |
| {RECIPIENT} | The recipient's name in the Chat |
| {DATE_CREATED} | The Chat's creation date |
| {DATE_LAST_UPDATED} | The Chat's last updated date |
- Specify if automated archiving of the Teams Chat should be enabled (Optional)
If this option is enabled, then the user must upload the 365|2CM Teams Chat Capture app package to their instance of Teams - See AUTOMATED TEAMS CHAT ARCHIVING for more details.

- Toggle the Archive Documents option. If enabled, files shared in the chat will also be archived in Content Manager as new Records. The Records will be created using the record type specified in Step 4.
Only files shared from your local computer are archived. Files shared from other SharePoint libraries will not be archived.
-
Toggle the Include Source In Notes option. If enabled, the URL of the Teams chat is added to the Record's notes

-
Once all the settings have been configured, click on the Save button

TEAMS CHAT TEMPLATE
A Microsoft Word template is required for generating PDFs for Teams Chats. The following placeholders can be used to capture data coming from the Teams Posts. The template must be stored in Content Manager.
| Placeholder | Data |
|---|---|
| {CHAT_ID} | The ID of the Teams Chat |
| {RECIPIENT} | The recipient's name in the Chat |
| {LINK} | A hyperlink to the Chat in Teams |
| {DATE_CREATED} | The Chat's creation date |
| {DATE_LAST_UPDATED} | The Chat's last updated date |
| {CONVERSATION} | The conversation between members in the Teams Chat |
EDIT/VIEW IN M365
The latest version of CMLauncher is required for this feature. CMLauncher will need to be set up to connect to Azure. Refer to the CMLauncher Azure App Registration and CMLauncher Install Guide for more information.
This feature will only work for documents that contain valid 365ID and Drive ID additional field values.
EDIT IN M365
- In CM, Right-click a record that was previously transferred from SharePoint via 365|2CM
- Click on Send To -> Edit in M365
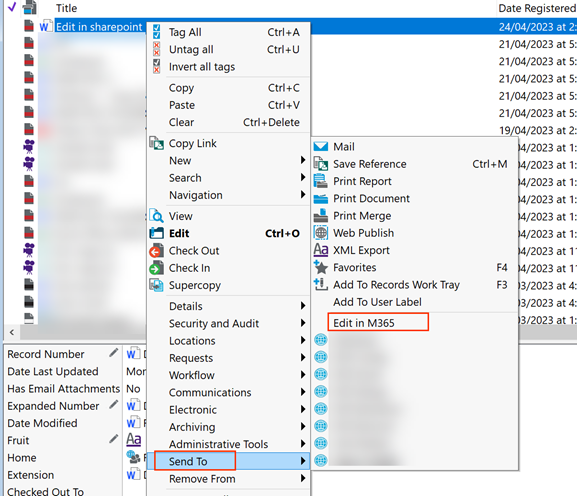
- The same document will be checked out in SharePoint
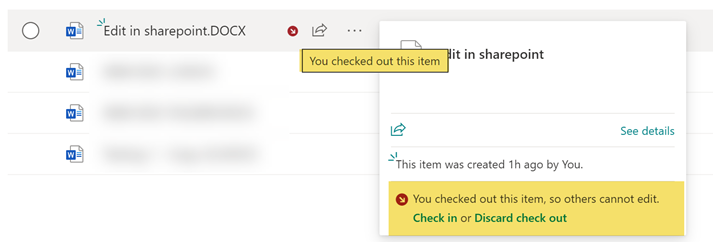
- Once you have finished making changes, close the program.

- CMLauncher will automatically check the document back into SharePoint with the changes made.
- The next time the 365|2CM archiving process is run on the SharePoint Library that contains the document edited above, the respective Record's electronic document will be updated
VIEW IN M365
- In CM, Right-click a record that was previously transferred from SharePoint via 365|2CM
- Click on Send To -> View in M365

- The document will launch in Read-Only mode in the default program specified for its file type.