

ACQUIRING THE FACEBOOK PAGE ID
Before creating a flow using the FYB Facebook connector, you will need to obtain the Facebook Page ID for the Facebook Page that will be used to archive posts from.
-
Navigate to https://developers.facebook.com/tools/explorer/
-
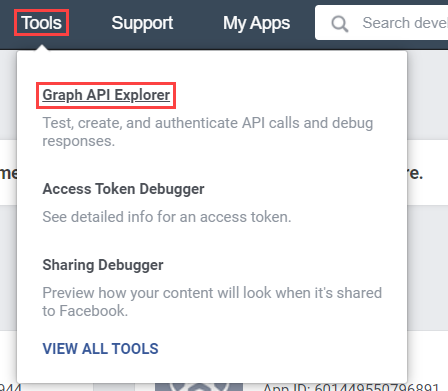
Hover over Tools and click on the Graph API Explorer option
-
Select the Facebook App that was used in the Facebook Connector Installation Guide

-
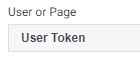
Within the User or Page drop down menu, select User Token
-
Enter the string below into the search bar, and click Submit
me/accounts

-
Locate the name of the Facebook Page and copy the id value which will be used in the next section

ACQUIRING A FACEBOOK PAGE ACCESS TOKEN
Before creating a flow using the FYB Facebook connector, you will need to obtain the Facebook Page Access Token in use by the Power2CM API.
- Open Power2CM in your web browser and navigate to the Connector section
- Copy the value in the FACEBOOK PAGE ACCESS TOKEN field

SAMPLE FLOWS
We have provided two sample flows to archive posts from Facebook to Content Manager. These sample flows will help you get set up with the FYB Facebook connector and can be used as a basis to design other flows:
- Facebook Page to CM Flow - This flow will archive posts/comments from a Facebook page to CM
- Facebook Profile Posts to CM Flow - This flow will archive posts from a personal Facebook profile to CM
Before using these sample flows ensure you have completed all steps from the Power2CM Installation Guide and Facebook Connector Installation Guide.
Before importing the samples, you need to create two connections in Power Automate:
- Power2CM Connection
- Facebook Connection
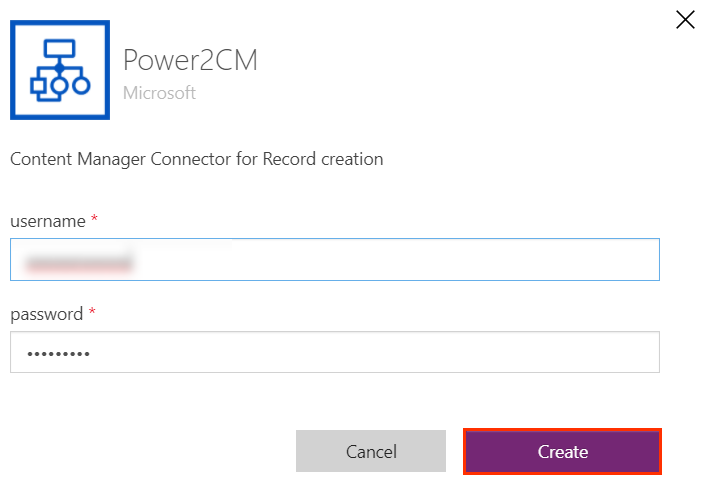
CREATING A POWER2CM CONNECTION
-
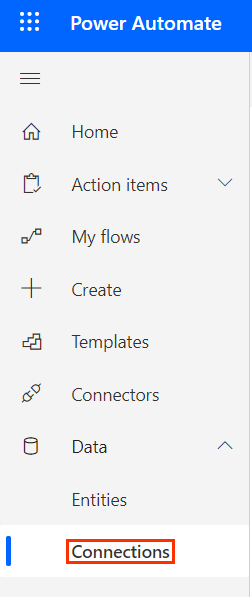
Once you have logged into Power Automate, click on Connections in the left menu under Data
-
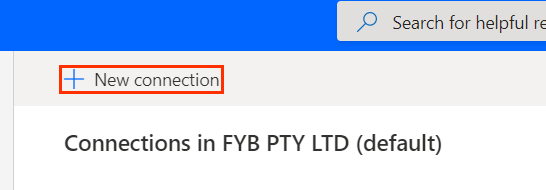
Click on the New connection button
-
Type Power2CM into the search bar and click on the Power2CM Connector (name may vary depending on the name given for the connector in the Power2CM Installation Guide)

-
Enter your Content Manager username and password into the username and password fields respectively, and click Create. Include the domain before the username
-
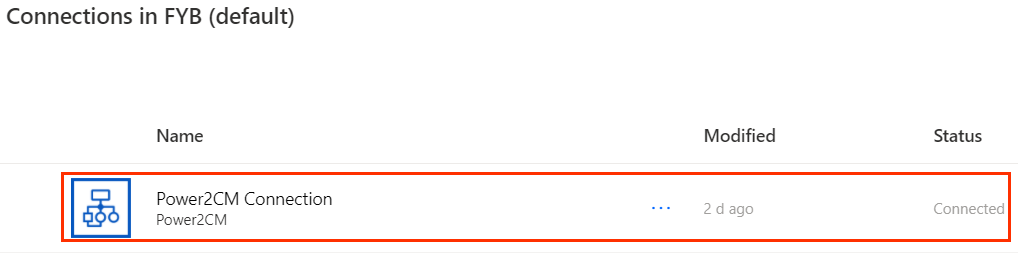
Your connection will now appear in the list of Power Automate connections. The status should state Connected
CREATING A FACEBOOK CONNECTION
-
Once you have logged into Power Automate, click on Connections in the left menu
-
Click on the New connection button
-
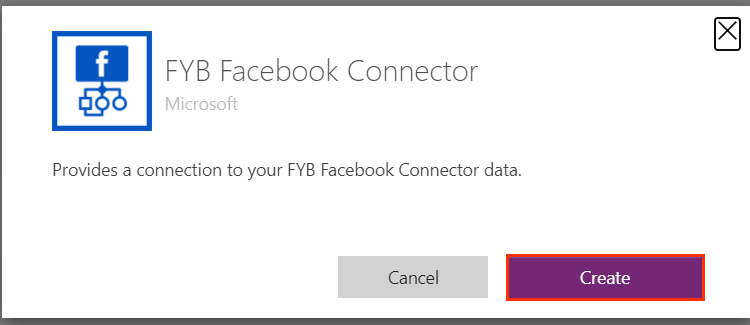
Type Facebook Connector into the search bar and select the FYB Facebook Connector

-
Click on the Create button
-
Follow the prompts in the browser pop-up. Sign in using the Facebook Developer account used in the Facebook Connector Installation guide
-
Once complete, your connection will now appear in the list of Power Automate connections. The status should say Connected

IMPORTING THE FACEBOOK PAGE TO CM FLOW
-
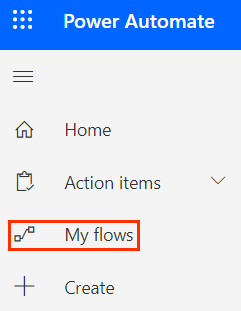
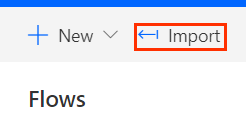
Once you have logged into Power Automate, click on My Flows in the left menu
-
Click on the Import button
-
Click on the Upload button

-
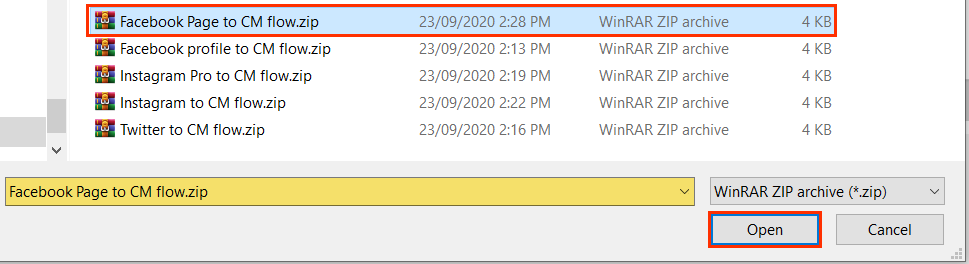
Select the Facebook Page to CM flow.zip file and click on the Open button
-
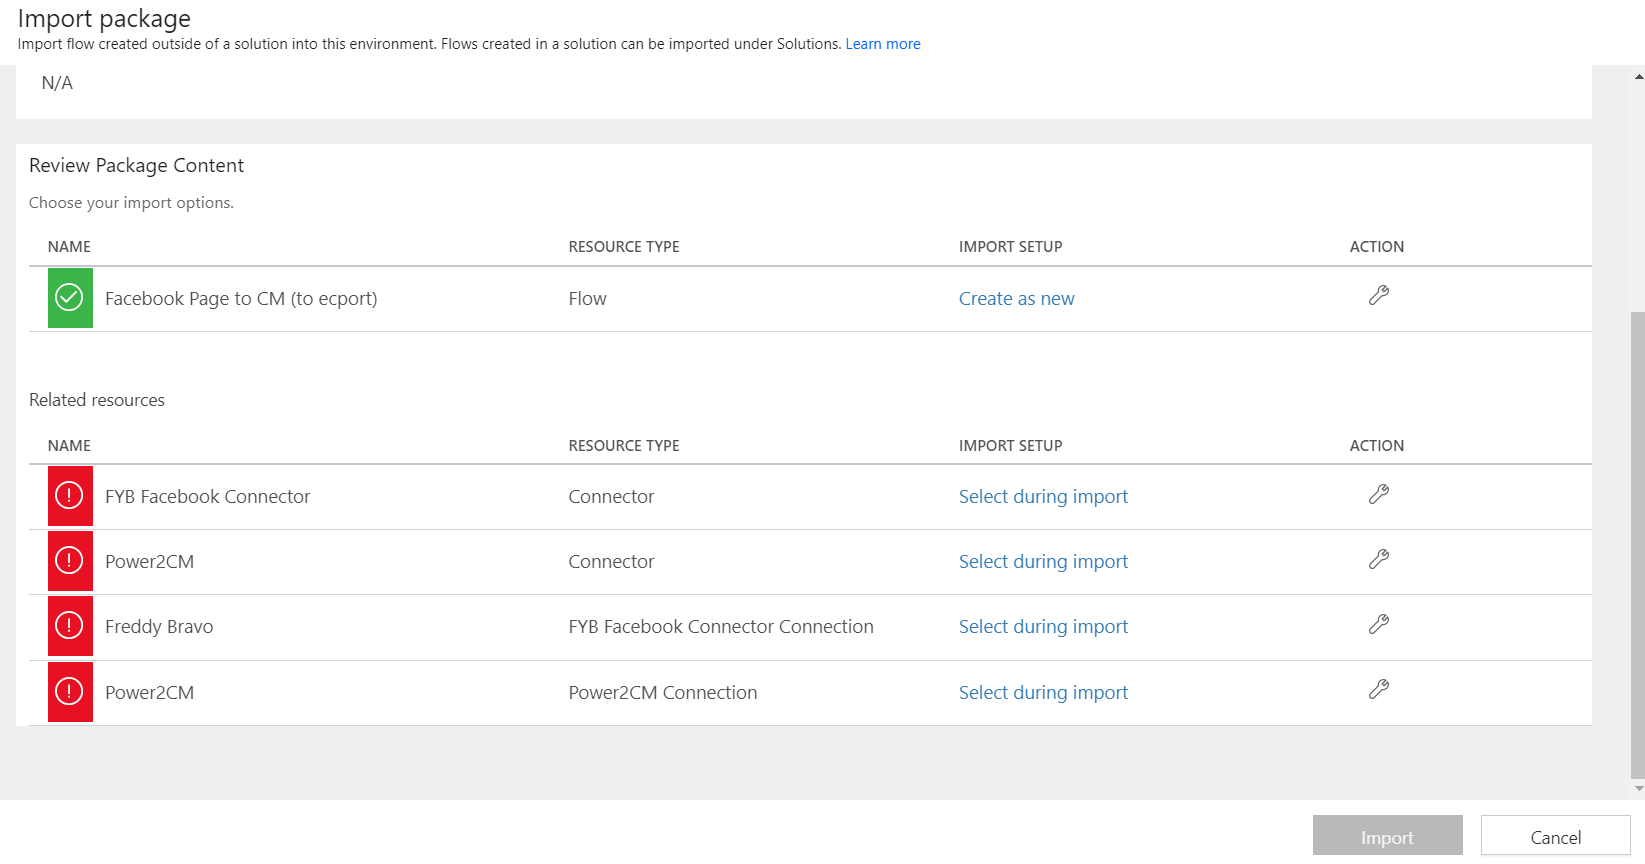
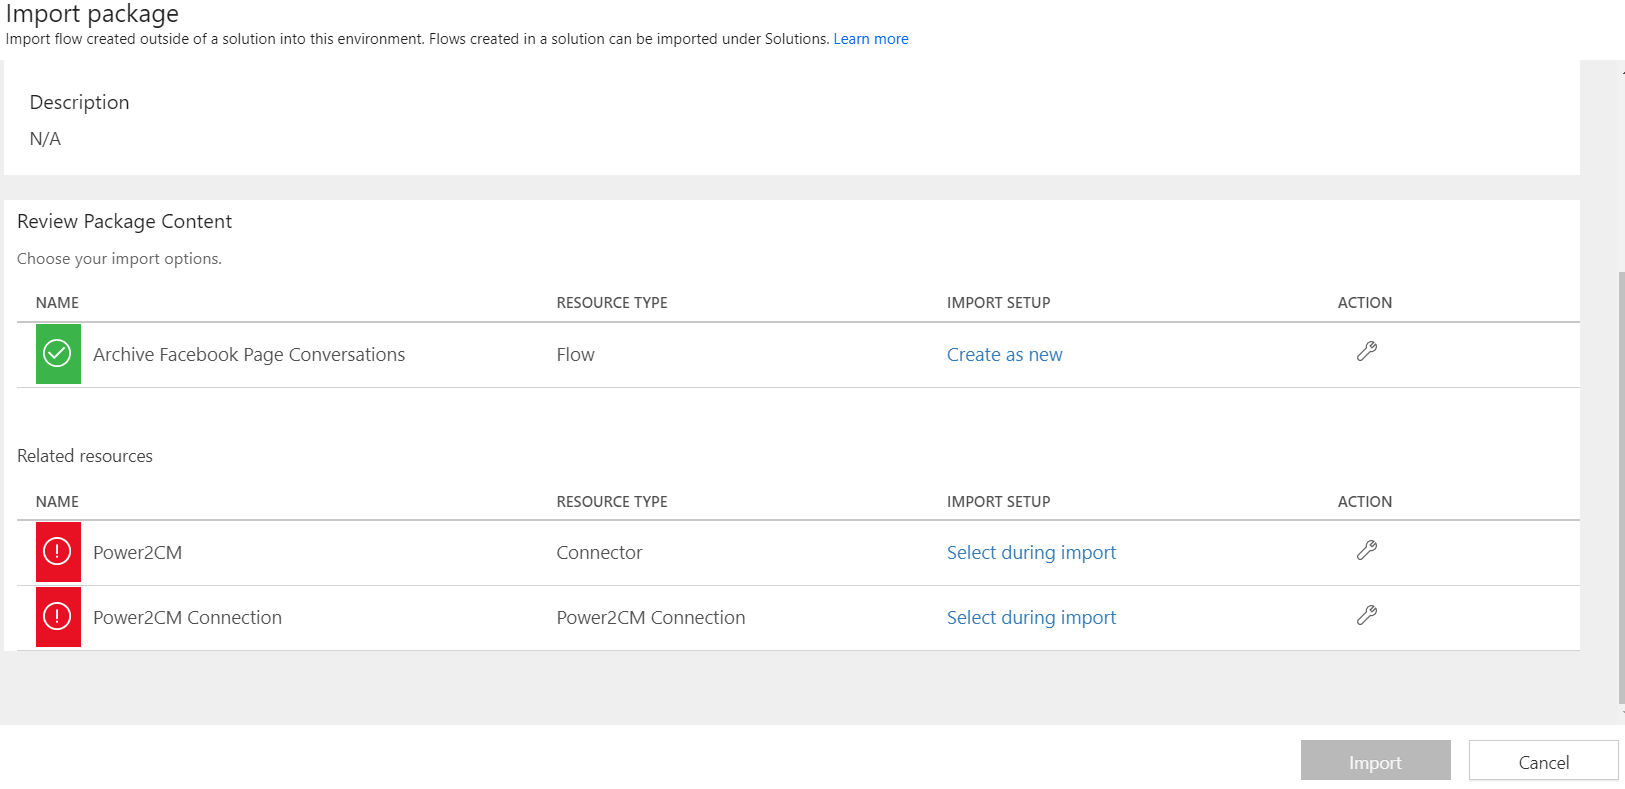
Once your file has finished uploading, you will be taken to the page below
-
The connectors/connections (resources) found in the Related Resources table will need to be mapped to your current connectors/connections.
This can be achieved by clicking the Select during import button found in the IMPORT SETUP column
| EXPORTED RESOURCE | RESOURCE TO MAP |
|---|---|
| FYB Facebook Connector | Select the Select during import button and then the Facebook Connector and click Save  |
| Power2CM | Select the Select during import button and then Power2CM then click Save  |
| Facebook Connection | Select the Select during import button and then your Facebook Connection and click Save. The name displayed will be the full name of the Facebook Developer account used in the CREATING A FACEBOOK CONNECTION  |
| Power2CM Connection | Select the Select during import button and then Power2CM and click Save  |
Each time a resource is mapped, its icon will change from  to
to 
-
Click on the Import button

-
You will receive a success message at the top of the page once your flow has been imported successfully

UPDATING THE FIELD VALUES
-
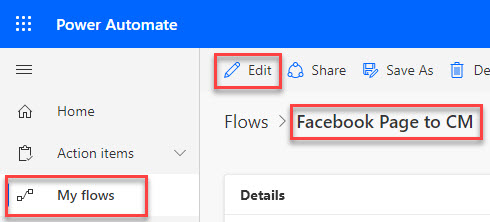
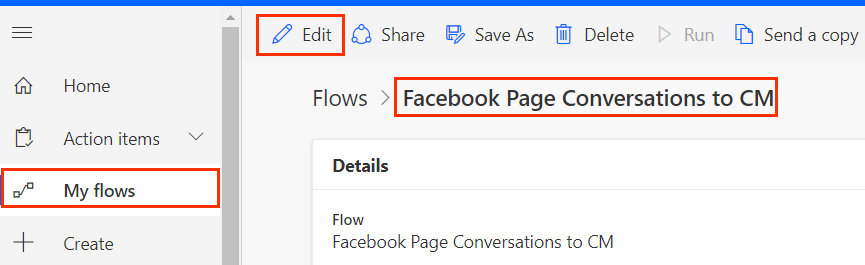
Edit the Facebook Page to CM flow that has been imported
-
Click on the Get Page Posts action

-
Enter the Facebook Page ID obtained from the ACQUIRING THE FACEBOOK PAGE ID section. Ensure only the number is entered with no " marks or spaces
-
Enter the Facebook Page Access Token obtained from the ACQUIRING A FACEBOOK PAGE ACCESS TOKEN section.
-
Click on the Archive Facebook Post action
-
Enter the URI of the record type that you wish to use into the Record Type field. Enter the record number of the container you wish to capture the posts in the Container field
For full information on all the fields please refer to the FACEBOOK CONNECTOR ACTIONS > ARCHIVE FACEBOOK POSTS section of this guide.
-
Click on the Save button

-
Your flow will be disabled by default. To enable it, click the Left Arrow button

-
Click on the Turn on toggle

IMPORTING THE FACEBOOK PAGE CONVERSATION TO CM FLOW
-
Once you have logged into Power Automate, click on My Flows in the left menu
-
Click on the Import button
-
Click on the Upload button
-
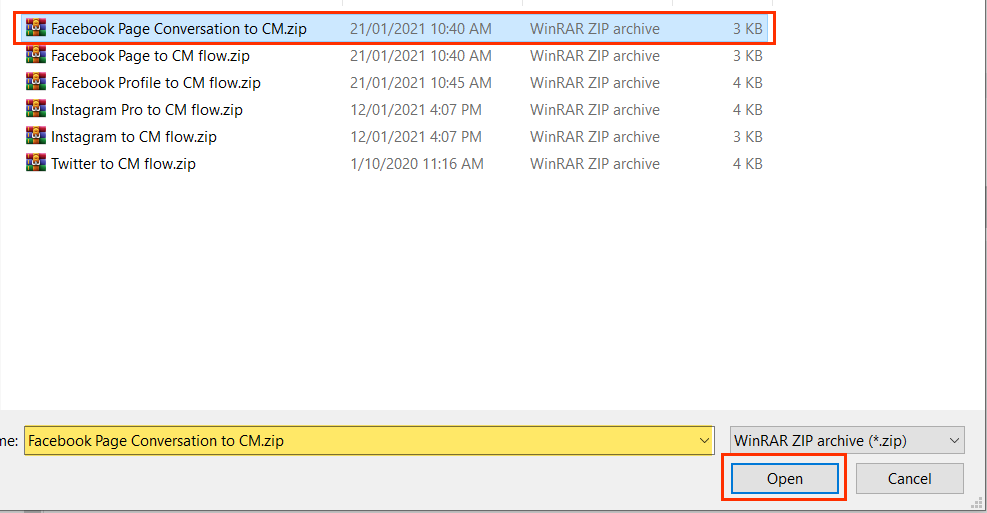
Select the Facebook Page Conversation to CM.zip file taken from your power2cm-files.zip package and click Open
-
Once your file has finished uploading, you will be taken to the page below
-
The connectors/connections (resources) found in the Related Resources table will need to be mapped to your current connectors/connections. This can be achieved by clicking the Select during import button found in the IMPORT SETUP column
| NAME | RESOURCE TO MAP |
|---|---|
| Power2CM | Select the Select during import button and then Power2CM then click Save 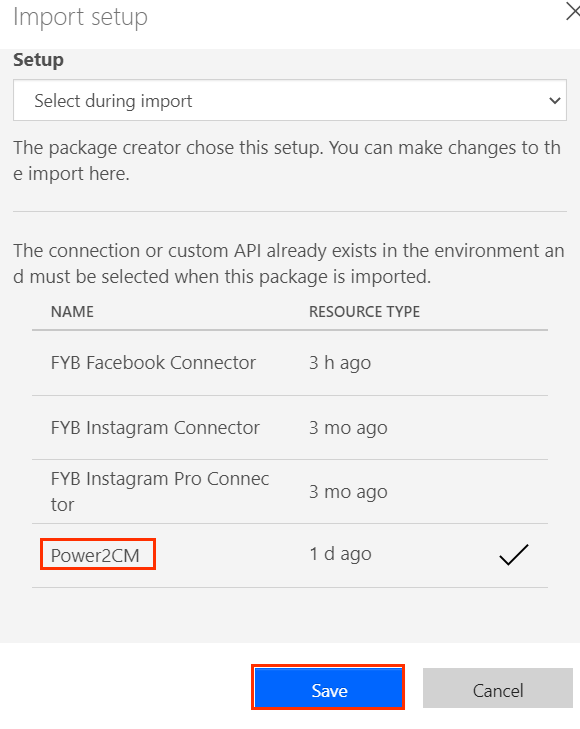 |
| Power2CM Connection | Select the Select during import field and then Power2CM and click Save 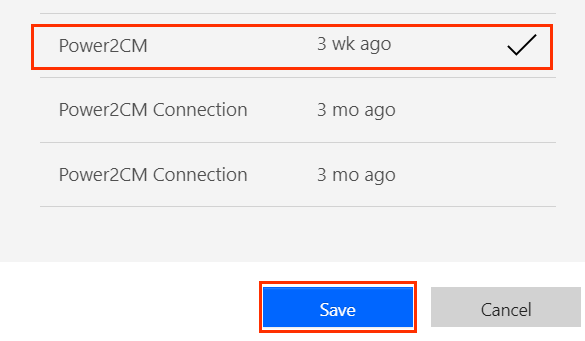 |
Each time a resource is mapped, its icon will change from to
-
Click on the Import button
-
You will receive a success message at the top of the page once your flow has been imported successfully

UPDATING THE FIELD VALUES
-
Edit the Facebook Page Conversation to CM flow that has been imported
-
Click on the Archive Facebook Page Conversations action and enter the URI of the record type that you wish to use into the Record Type field. Enter the record number of the container you wish to capture the posts in the Container field
-
Enter the Facebook Page ID obtained from the ACQUIRING THE FACEBOOK PAGE ID section. Ensure only the number is entered with no " marks or spaces
For full information on all the fields please refer to the FACEBOOK CONNECTOR ACTIONS > ARCHIVE FACEBOOK PAGE CONVERSATIONS section of this guide.
-
Click on the Save button
-
Your flow will be disabled by default. To enable it, click the Left Arrow button

-
Clickon the Turn on toggle
IMPORTING THE FACEBOOK PROFILE POSTS TO CM FLOW
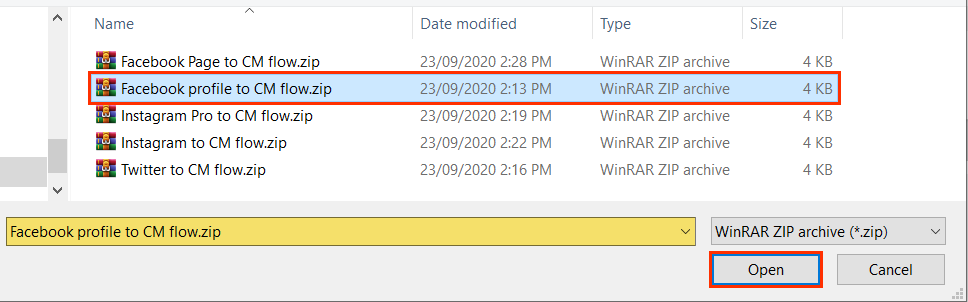
To import the Facebook Profile Posts to CM flow the same steps from the IMPORTING THE FACEBOOK PAGE TO CM FLOWS section can be followed, in step 4 select the Facebook profile to CM flow.zip file.
UPDATING THE FIELD VALUES
-
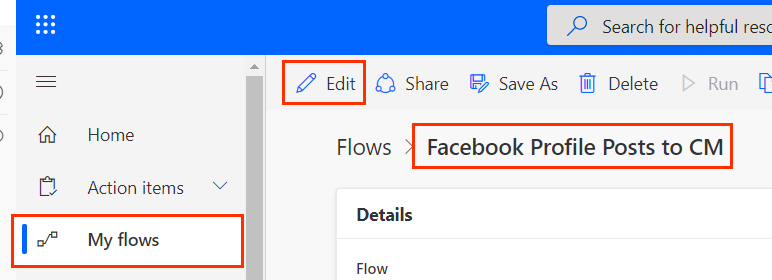
Edit the Facebook Profile Posts to CM flow that has been imported
-
Click on the Archive Facebook Post action. Enter the URI of the record type that you wish to use into the Record Type field. Enter the record number of the container you wish to capture the posts in the Container field
For full information on all the fields please refer to the FACEBOOK CONNECTOR ACTIONS > ARCHIVE FACEBOOK POST section of this guide.
-
Click on the Save button
-
Your flow will be disabled by default. To enable it, click the Left Arrow button

-
Click on the\ Turn on toggle
Your flow will now run once a day. Records already created from previous flows will be updated using the id supplied in the Id field of the Create Record in CM action.
FACEBOOK CONNECTOR ACTIONS
Below is a list of all actions available with the connector and what can be set up with them.
GET MY POSTS
Gets all the posts created by the currently logged in Facebook user.
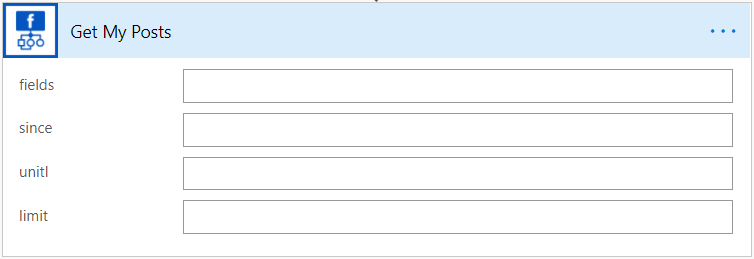
| Name | Description |
|---|---|
| fields | The fields to be returned from the API call. We recommend using the following value: message,from,full_picture,created_time,updated_time,reactions.limit(0).summary(true),shares,comments{attachment,from,message,created_time,comments{attachment,from,message,created_time,comments}} |
| since | Use this field to query for posts created after the date specified in this field. Note, Facebook Graph API dates are in UTC-08:00 timezone. The Date time value needs to be in the following format: YYYY-MM-DDTHH:MM:SS+0000, for example: The value entered in the Since field for querying for posts that were made after 21/08/2020 at 9:30 PM will be 2020-08-21T21:30:00-0000 |
| until | Use this field query for posts created until the date specified in this field. Note, Facebook Graph API dates are in UTC-08:00 timezone. The Date time value needs to be in the following format: YYYY-MM-DDTHH:MM:SS+0000, for example: The value entered in the Until field for querying for posts that were made before 21/08/2020 at 9:30 PM will be 2020-08-21T21:30:00-0000 |
| limit | Specify the number of posts returned, for example, entering 100 will return 100 posts. |
GET COMMENTS
This action will retrieve all comments and attachments within the comments from a Facebook post.
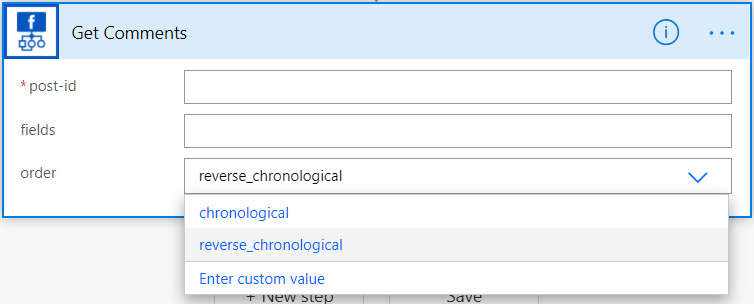
| Name | Description |
|---|---|
| post-id | The post id of a Facebook post, for example: 654866888476824_652121628751350 |
| fields | The fields to be returned from the API call. We recommend using the following value: attachment,from,message,created_time |
| order | The order in which the comments are displayed. The values for this field can either be chronological or reverse_chronological |
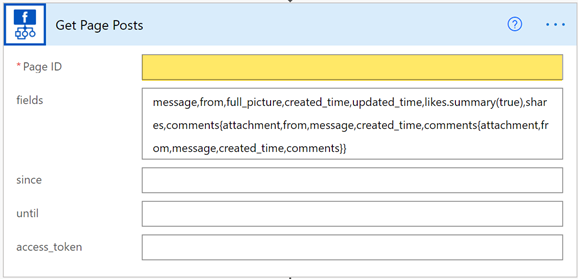
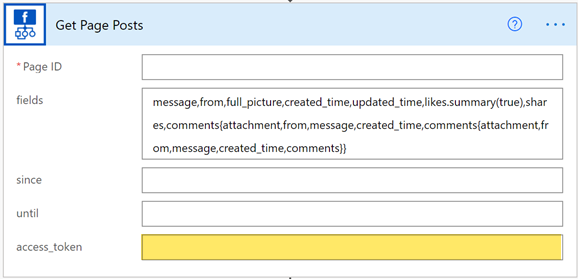
GET PAGE POSTS
This action will retrieve all posts from a Facebook Page.
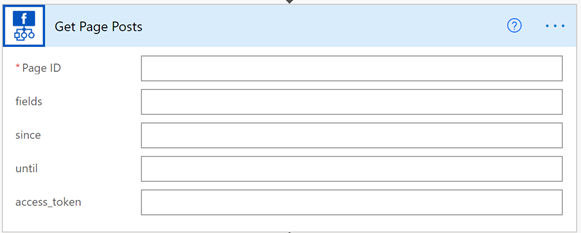
| Name | Description |
|---|---|
| Page ID | The ID of the Facebook page that the action will retrieve posts from |
| fields | The fields to be returned from the API call. We recommend using the following value: message,from,full_picture,created_time,updated_time,likes.summary(true),shares,comments{attachment,from,message,created_time,comments{attachment,from,message,created_time,comments}} |
| since | For retrieving posts after the supplied Date Time. The Date Time value must be in the following format: YYYY-MM-DD, for example: 2021-06-06 |
| until | For retrieving posts before the supplied Date Time. The Date Time value must be in the following format: YYYY-MM-DD, for example: 2021-06-06 |
| access_token | Used for the Facebook Page Access Token |
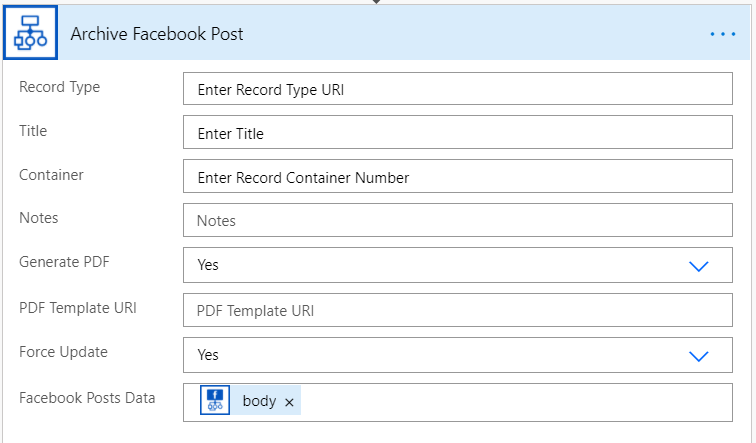
ARCHIVE FACEBOOK POSTS
Requires Power2CM Connector
This action is to be used in conjunction with the Get My Posts and Get Page Posts FYB Facebook Connector actions to save the data from Facebook into CM.
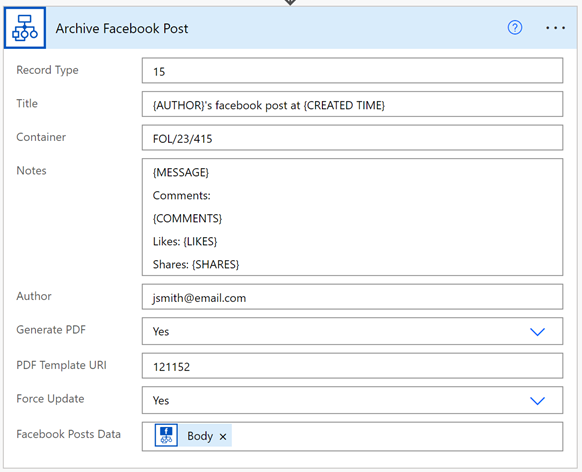
| Name | Description |
|---|---|
| Record Type | The record Type URI |
| Title | Title of the record |
| Container | Container number of the container that the record will be created in |
| Notes | The notes of the Record |
| Author | Specify the email or full name of the location to be used as the Author location for the record. This value will be used if Power2CM cannot find a matching location for the author of the Facebook post. |
| Generate PDF | If Yes is selected, a pdf will be generated using the Title, Date Created, Author, Attachment Url and Notes fields. This pdf will be set as the electronic document of the record. |
| PDF Template URI | The URI of a record to be used as the template for generating pdf files. See the PDF TEMPLATES section in the Power2CM User Manual for more information |
| Force Update | If Yes is selected, existing records are always updated (new revisions created) every time the flow is run. This is for scenarios where the preceding connector (e.g. The FYB Instagram Pro Connector) does not have a date last updated field |
| Facebook Posts Data | The JSON data returned from the Get My Posts or Get Page Posts FYB Facebook Connector actions |
PLACEHOLDERS
The Notes field can contain the following placeholders:
| Placeholder | Description |
|---|---|
| {AUTHOR} | The author of the Facebook Post |
| {COMMENTS} | The comments on the facebook posts. Comments include:
|
| {CREATED TIME} | The created date of the Post |
| {LIKES} | Total likes for a post |
| {MESSAGE} | The message/caption on a post |
| {PEOPLE REACHED} | The number of people reached on a Facebook Page Post. This requires both a Facebook Page Access Token and the pages_read_engagement and read_insights Facebook Permissions. |
| {SHARES} | The total number of shares on a post |
| {UPDATED TIME} | That last modified date of a post |
The Titles field can contain the following placeholders:
| Placeholder | Description |
|---|---|
| {AUTHOR} | The author of the Facebook Post |
| {CREATED TIME} | The created date of the Post |
| {LIKES} | Total likes for a post |
| {MESSAGE} | The message/caption on a post |
| {SHARES} | The total number of shares on a post |
| {UPDATED TIME} | That last modified date of a post |
Example use of the Archive Facebook Posts action:

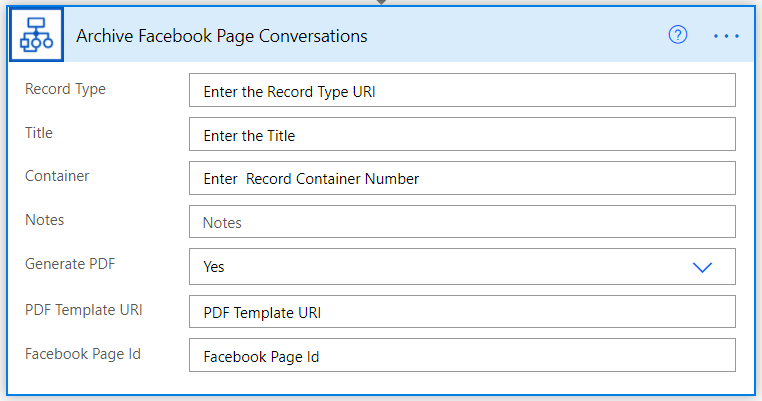
ARCHIVE FACEBOOK PAGE CONVERSATIONS
Requires Power2CM Connector
This action is to be used to archive all the conversations of a given Facebook Page to Content Manager. The Facebook account you use must be the admin of the page you wish to archive conversations from.
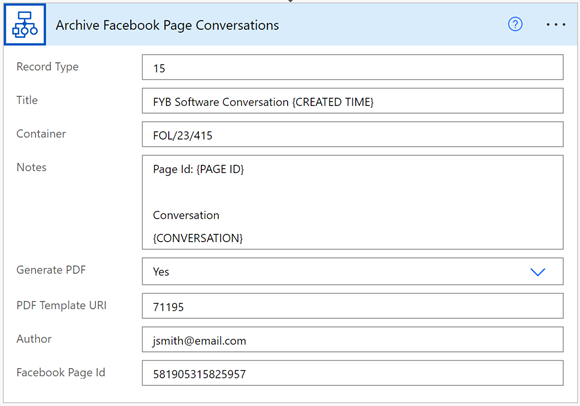
| Name | Description |
|---|---|
| Record Type | The record Type URI |
| Title | Title of the record |
| Container | Container number of the container that the record will be created in |
| Notes | The notes of the Record |
| Generate PDF | If Yes is selected, a pdf will be generated using the Title, Date Created, Author, Attachment Url and Notes fields. This pdf will be set as the electronic document of the record. |
| PDF Template URI | The URI of a record to be used as the template for generating pdf files. See the PDF TEMPLATES section in the Power2CM User Manual for more information |
| Author | Specify the email or full name of the location to be used as the Author location for the record |
| Facebook Page Id | The Page Id of the Facebook Page to archive conversations from. Please refer to the ACQUIRING THE FACEBOOK PAGE ID section to obtain the Page Id. |
PLACEHOLDERS
The Notes field can contain the following placeholders:
| Placeholder | Description |
|---|---|
| {CONVERSATION} | The conversation between the Facebook Page and a Facebook User |
| {UPDATED TIME} | The created/last updated date of the conversation |
| {PAGE ID} | The Id of the Facebook Page |
The Titles field can contain the following placeholders:
| Placeholder | Description |
|---|---|
| {UPDATED TIME} | The created/last updated date of the conversation |
| {PAGE ID} | The Id of the Facebook Page |
Example use of the Archive Facebook Page Conversations action:

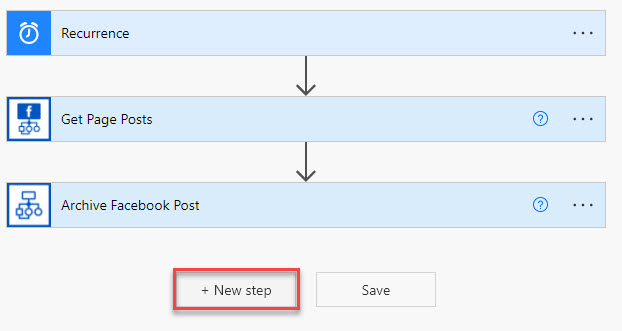
ERROR HANDLING NOTIFICATIONS (OPTIONAL)
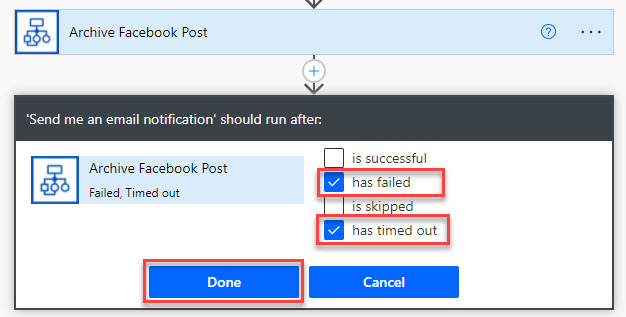
Power2CM contains the ability to provide email notifications of any errors that occur during the transfer process. This email will be sent once per day. If this error notification is required to be sent after a failed processed request, an additional step can be included in a flow to allow for an instantaneous message to be sent to the nominated person.
Below is an example of error handling for a Facebook flow, this can be completed for all types of flows.
To add an error handling step to the end of the connector, complete the following:
-
Select the flow to change and click on the Edit button

-
Click on the New Step Button, this will add the step to the end of the flow
-
Click on the the Notifications button
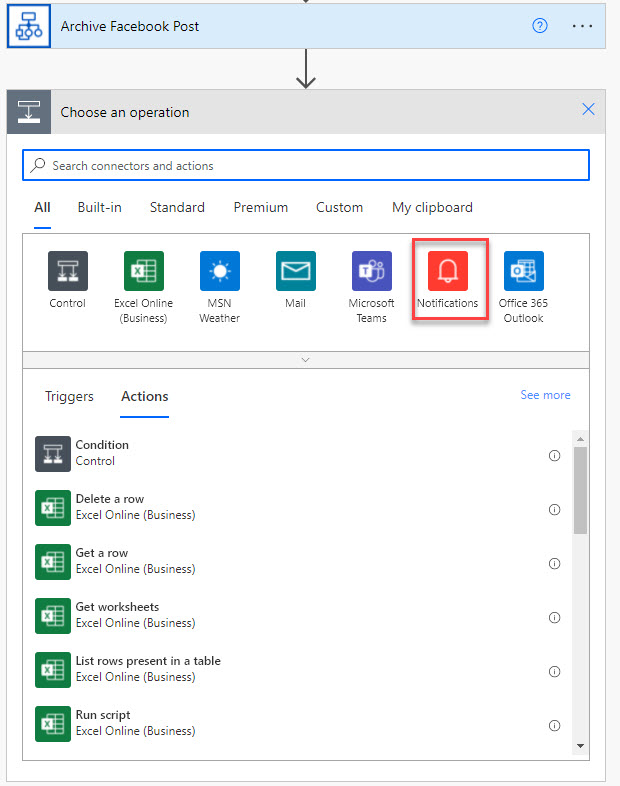
-
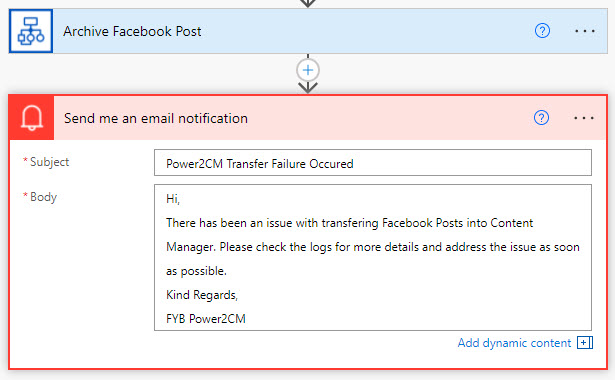
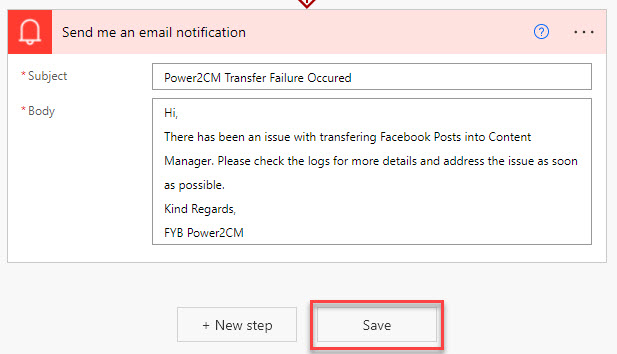
Select the preferred notification type, Email or Mobile Notification, and fill out the required details required.
-
Click the '...' menu in the top right of the action, and click Configure Run After item.
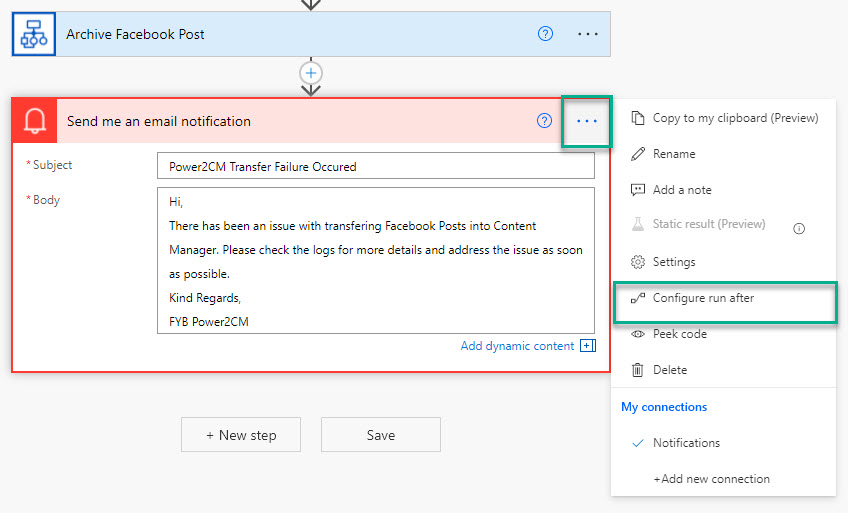
-
Check the Has Failed and Has Timed Out check boxes only and proceed by clicking the Done button
-
Click on the Save button
-
Repeat the process above for any other flows desired.