ACCESS
Only users that are a part of the Content Manager PRONI User Group location will be able to use the PRONI Exporter. Users can be added to this group through the Content Manager client. The group that PRONI Exporter uses is set via its admin console.
EXPORTING RECORDS
- Open Content Manager
- Tag the containers you wish to export or right-click a single container

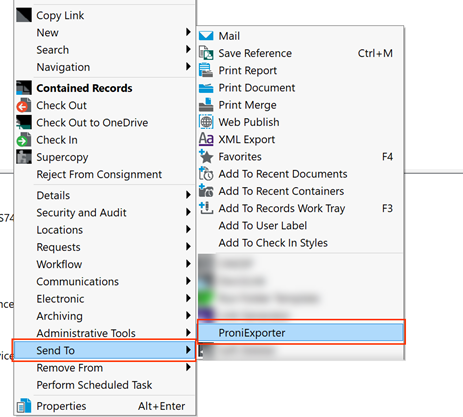
- Right-click a tagged container, then select Send To > PRONI Exporter
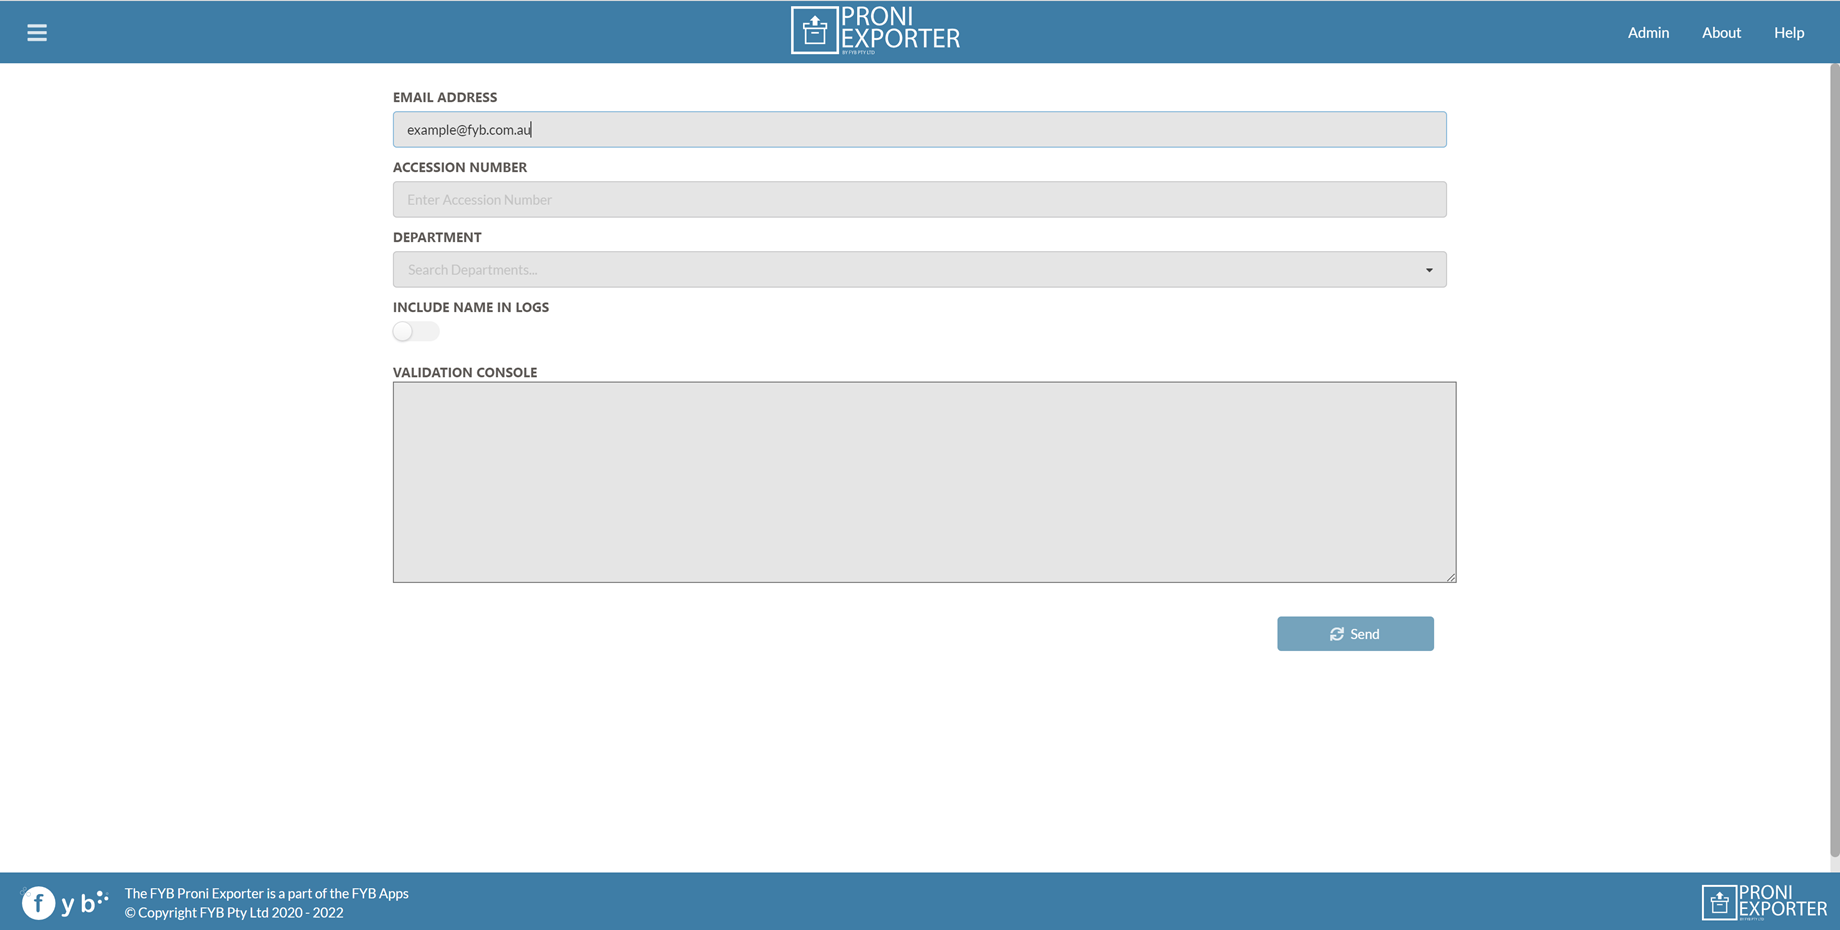
- The export page will launch in the user's default browser
EXPORT FIELDS
The following fields can be filled out prior to export.
| FIELD | DESCRIPTION |
|---|---|
| EMAIL ADDRESS | By default, this field will show the user's email address. This field can be changed as required. |
| ACCESSION NUMBER | This field is required for the export. The Accession Number must be in the format ‘DR’ or NDR-nnnnn-YYYY, e.g. DR-2-2016 or NDR-1-2016 |
| DEPARTMENT | Select the department location from the dropdown. This will be used to prefix the generated Transfer Identifier as well as determine which folder within the export path the documents will be transferred to. |
| INCLUDE NAME IN LOGS | If enabled, the user's name will be included in the logs for traceability. |
| VALIDATION CONSOLE | This console will show any low level validation issues associated with exporting the records, further information for validation issues can be found in the Validation Report produced after export. |
| SEND | Click this button to begin the export process |
THE EXPORT PROCESS
Once the user clicks Send, the export process will begin to export the records within the tagged container(s).
- Only Records that have passed metadata validation will be exported
- Records that have failed validation will be added to the Metadata Validation report, along with the fields that failed validation
- Duplicate file names exported from records will have a number appended to the filename (e.g. document(1).docx). The original file name of the record is located in the OriginalFileName columns of the Export Metadata file
- Duplicate email attachments have an underscore followed by a number appended to the file name (e.g. fileAttachment_1.docx)
- TR5 files are exported as txt files
- When a Record is successfully exported, the Record's Exported To Proni additional field is set to True. This is to allow for Records that have been successfully exported to be skipped during the next export
TRANSFER IDENTIFIER
A unique transfer identifier is generated per export, per day. This identifier is prefixed to the Metadata validation report.
EXPORT NOTIFICATIONS
On completion of an export, an email is sent to both the user who triggered the export as well as the PRONI Administrator and Support Administrator email addresses. The email will notify the users if the export succeeded or failed.
METADATA VALIDATION REPORT
All mandatory fields from the Digital Object Metadata Schema are validated for all records being exported. Any record that fails this validation is not exported. A report is generated for each record that failed the validation as well as the fields that did not pass validation. A written report is created and located at the export path on the server. The report will be named like the following: TransferId_MetadataValidation.csv eg. DOF_1207201601_MetadataValidation.csv
EXPORT METADATA FILE
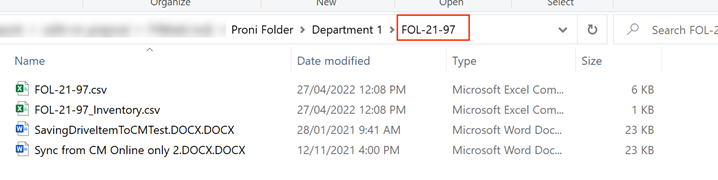
For every container successfully exported, an Export Metadata file titled ContainerID.csv (eg. DC1-07-1785.csv) is created. This file contains the values for all fields in the Digital Object Metadata Schema for each record within the exported container.
EXPORT INVENTORY FILE
On Export completion, an Inventory file is created for each export. The file contains the following information for each document record exported: Filename, FileSize, DateModified, DateCreated, Export Path and MD5 Checksum.
On successful export, the PRONI Administrator contacts receive an email containing the Inventory file.
If an export fails, the user who ran the export, the Proni Admin and the Support Admin contacts receive the Inventory file attached to the export error email.
DEPARTMENTAL INVENTORY FILE
On successful export completion, a Departmental Inventory CSV file is generated and sent to the user who ran the export as an attachment in the export success email.
The file contains the following information for each document record exported: Record Number, Container Number and Record Title
SUMMARY REPORT
The Summary Report CSV file contains the following information:
- Total number of HPRM Containers exported
- Total number of HPRM Records exported
- Total number of Objects exported (email attachments)
The summary is attached and sent with the successful export email to the Proni Administrators.
EXPORT STRUCTURE
Each tagged Content Manager container is exported to a Windows folder within the export path, the folder created will be titled with the record number from Content Manager. All documents that pass metadata validation stored in the Content Manager container will be copied to this Windows folder.